一、BlockingQueue 接口
Java 中的阻塞队列都是实现 BlockingQueue 接口的实现类。BlockingQueue 继承自 Queue,所以其实现类也可以作为 Queue 的实现来使用,而 Queue 又继承自 Collection 接口。所以 BlockingQueue 可以使用 Queue 和 Collection 的方法。 但一般我们使用 BlockingQueue 是因为它提供了获取队列元素但是队列为空时,会阻塞等待队列中有元素再返回和添加元素时,如果队列已满,那么等到队列可以放入新元素时再放入这两种功能。
BlockingQueue 对插入操作、移除操作、获取元素操作提供了四种不同的处理方式:1、抛出异常;2、返回特殊值(null 或 true/false,取决于具体的操作);3、一直阻塞;4、超时退出。总结如下:
| 抛出异常 | 返回特殊值 | 一直阻塞 | 超时退出 | |
|---|---|---|---|---|
| 插入 | add(e) | offer(e) | put(e) | offer(e, time, unit) |
| 移除 | remove() | poll() | take() | poll(time, unit) |
| 获取元素 | element() | peek() | / | / |
我们需要关注的应该是 put(e) 和 take() 这两个方法,因为这两个方法是带阻塞的,是 BlockingQueue 的核心功能。
二、BlockingQueue 的实现
JDK7 中提供了 7 个阻塞队列,分别是:
- ArrayBlockingQueue :底层是数组,有界队列,元素按照先进先出排列。
- LinkedBlockingQueue :底层是单向链表,可以当做无界和有界队列来使用,元素按照先进先出排列。
- PriorityBlockingQueue :底层是数组,无界队列,元素按优先级排列,基于最小堆实现。
- DelayQueue:底层是数组,无界队列,元素按可取出时间排列(元素在入队时需要指定一个延迟期,表示延迟多久才能从队列中取出),基于最小堆实现。
- SynchronousQueue:一个不存储元素的阻塞队列。
- LinkedTransferQueue:底层是单向链表,无界队列,和 LinkedBlockingQueue 的不同之处在于多了
transfer和tryTransfer,允许元素在入队之前直接传输给消费者。 - LinkedBlockingDeque:底层是双向链表,无界队列,可以在两端插入和移出元素。
1、ArrayBlockingQueue
ArrayBlockingQueue 是一个用数组实现的有界阻塞队列。此队列按照先进先出的原则对元素进行排序。可以支持公平和非公平两种模式,公平性是由 ReentrantLock 实现的。在非公平模式下,当一个线程请求锁时,如果在发出请求的同时锁变成可用状态,那么这个线程会跳过队列中所有的等待线程而获得锁。ArrayBlockingQueue 的属性如下:
1 | // 用于存放元素的数组 |
ArrayBlockingQueue 实现并发同步的原理是:读操作和写操作都需要获取到 AQS 独占锁才能进行操作,如果队列为空,这个时候读操作的线程进入到读线程队列排队,等待写线程写入新的元素,然后唤醒读线程队列的第一个等待线程;如果队列已满,这个时候写操作的线程进入到写线程队列排队,等待读线程将队列元素移除腾出空间,然后唤醒写线程队列的第一个等待线程。
2、LinkedBlockingQueue
底层基于单向链表实现的阻塞队列,可以当做无界队列也可以当做有界队列来使用。看构造方法:1
2
3
4
5
6
7
8
9
10
11// 无界队列
public LinkedBlockingQueue() {
this(Integer.MAX_VALUE);
}
// 有界队列
public LinkedBlockingQueue(int capacity) {
if (capacity <= 0) throw new IllegalArgumentException();
this.capacity = capacity;
last = head = new Node<E>(null);
}
LinkedBlockingQueue 的属性:1
2
3
4
5
6
7
8
9
10
11
12
13
14
15
16
17
18
19
20// 队列容量
private final int capacity;
// 队列中的元素数量
private final AtomicInteger count = new AtomicInteger(0);
// 队头
private transient Node<E> head;
// 队尾
private transient Node<E> last;
// take, poll, peek 等读操作的方法需要获取到这个锁
private final ReentrantLock takeLock = new ReentrantLock();
// 如果读操作的时候队列是空的,那么等待 notEmpty 条件
private final Condition notEmpty = takeLock.newCondition();
// put, offer 等写操作的方法需要获取到这个锁
private final ReentrantLock putLock = new ReentrantLock();
// 如果写操作的时候队列是满的,那么等待 notFull 条件
private final Condition notFull = putLock.newCondition();
可以看到 LinkedBlockingQueue 使用了双锁队列来提高队列吞吐量。双锁的使用如下:
- takeLock 和 notEmpty:如果要获取(take)一个元素,需要获取 takeLock 锁,但是获取了锁还不够,如果队列此时为空,还需要队列不为空(notEmpty)这个条件(Condition)。
- putLock 和 notFull:如果要插入(put)一个元素,需要获取 putLock 锁,但是获取了锁还不够,如果队列此时已满,还需要队列不是满的(notFull)这个条件(Condition)。
为什么 ArrayBlockingQueue 不使用双锁呢?
这是因为ArrayBlockingQueue 本身的入队和出队操作已经足够轻快了。LinkedBlockingQueue 使用双锁是因为 LinkedBlockingQueue 添加需要构造节点,导致较长的等待,所以同时存取有较大优化。 而 ArrayBlockingQueue 本身的入队和出队操作就足够轻快,转成双锁之后,对比原来的存取操作,需要多竞争两次。一次是 count 变量的 cas 操作,另一次是获得另一把锁的通知操作,这部分的损耗要比并发存取带来的收益更大。
3、PriorityBlockingQueue
带排序的 BlockingQueue 实现,其并发控制采用的是 ReentrantLock,队列为无界队列,开始的时候可以指定初始的队列大小,后面插入元素的时候,如果空间不够的话会自动扩容。
简单地说,它就是 PriorityQueue 的线程安全版本。不可以插入 null 值,同时,插入队列的对象必须是可比较大小的(comparable),否则报 ClassCastException 异常。它的插入操作 put 方法不会 block,因为它是无界队列(take 方法在队列为空的时候会阻塞)。
它的属性如下:1
2
3
4
5
6
7
8
9
10
11
12
13
14
15
16
17
18
19
20
21
22
23
24
25
26// 构造方法中,如果不指定大小的话,默认大小为 11
private static final int DEFAULT_INITIAL_CAPACITY = 11;
// 数组的最大容量
private static final int MAX_ARRAY_SIZE = Integer.MAX_VALUE - 8;
// 这个就是存放数据的数组
private transient Object[] queue;
// 队列当前大小
private transient int size;
// 大小比较器,如果按照自然序排序,那么此属性可设置为 null
private transient Comparator<? super E> comparator;
// 并发控制所用的锁,所有的 public 且涉及到线程安全的方法,都必须先获取到这个锁
private final ReentrantLock lock;
// 由上面的 lock 属性创建,取出时需要判断队列是否为空
private final Condition notEmpty;
// 这个也是用于锁,用于数组扩容的时候,需要先获取到这个锁,才能进行扩容操作
// 其使用 CAS 操作
private transient volatile int allocationSpinLock;
// 用于序列化和反序列化的时候用,对于 PriorityBlockingQueue 我们应该比较少使用到序列化
private PriorityQueue q;
此类实现了 Collection 和 Iterator 接口中的所有接口方法,对其对象进行迭代并遍历时,不能保证有序性。如果你想要实现有序遍历,建议采用 Arrays.sort(queue.toArray()) 进行处理。PriorityBlockingQueue 提供了 drainTo 方法用于将部分或全部元素有序地填充(准确说是转移,会删除原队列中的元素)到另一个集合中。还有一个需要说明的是,如果两个对象的优先级相同(compare 方法返回 0),此队列并不保证它们之间的顺序。
PriorityBlockingQueue 使用了基于数组的最小堆来存放元素,所有的 public 方法采用同一个 lock 进行并发控制。
我们来看一下它的构造方法:1
2
3
4
5
6
7
8
9
10
11
12
13
14
15
16
17
18
19
20
21
22
23
24
25
26
27
28
29
30
31
32
33
34
35
36
37
38
39
40
41
42
43
44
45
46
47
48
49
50
51
52// 默认构造方法,采用默认值(11)来进行初始化
public PriorityBlockingQueue() {
this(DEFAULT_INITIAL_CAPACITY, null);
}
// 指定数组的初始大小
public PriorityBlockingQueue(int initialCapacity) {
this(initialCapacity, null);
}
// 指定比较器
public PriorityBlockingQueue(int initialCapacity, Comparator<? super E> comparator) {
if (initialCapacity < 1)
throw new IllegalArgumentException();
this.lock = new ReentrantLock();
this.notEmpty = lock.newCondition();
this.comparator = comparator;
this.queue = new Object[initialCapacity];
}
// 在构造方法中就先填充指定的集合中的元素
public PriorityBlockingQueue(Collection<? extends E> c) {
this.lock = new ReentrantLock();
this.notEmpty = lock.newCondition();
//
boolean heapify = true; // true if not known to be in heap order
boolean screen = true; // true if must screen for nulls
if (c instanceof SortedSet<?>) {
SortedSet<? extends E> ss = (SortedSet<? extends E>) c;
this.comparator = (Comparator<? super E>) ss.comparator();
heapify = false;
}
else if (c instanceof PriorityBlockingQueue<?>) {
PriorityBlockingQueue<? extends E> pq =
(PriorityBlockingQueue<? extends E>) c;
this.comparator = (Comparator<? super E>) pq.comparator();
screen = false;
if (pq.getClass() == PriorityBlockingQueue.class) // exact match
heapify = false;
}
Object[] a = c.toArray();
int n = a.length;
// If c.toArray incorrectly doesn't return Object[], copy it.
if (a.getClass() != Object[].class)
a = Arrays.copyOf(a, n, Object[].class);
if (screen && (n == 1 || this.comparator != null)) {
for (int i = 0; i < n; ++i)
if (a[i] == null)
throw new NullPointerException();
}
this.queue = a;
this.size = n;
if (heapify)
heapify();
}
接下来是内部的自动扩容实现:1
2
3
4
5
6
7
8
9
10
11
12
13
14
15
16
17
18
19
20
21
22
23
24
25
26
27
28
29
30
31
32
33
34
35
36
37
38
39private void tryGrow(Object[] array, int oldCap) {
// 释放了原来的独占锁 lock,这样的话,扩容操作和读操作可以同时进行,提高吞吐量
lock.unlock(); // must release and then re-acquire main lock
Object[] newArray = null;
// 用 CAS 操作将 allocationSpinLock 由 0 变为 1,也算是获取锁
if (allocationSpinLock == 0 &&
UNSAFE.compareAndSwapInt(this, allocationSpinLockOffset, 0, 1)) {
try {
// 如果节点个数小于 64,那么增加 oldCap + 2 的容量
// 如果节点数大于等于 64,那么增加 oldCap 的一半
// 所以节点数较小时,增长得快一些
int newCap = oldCap + ((oldCap < 64) ? (oldCap + 2) : (oldCap >> 1));
// 这里有可能溢出
if (newCap - MAX_ARRAY_SIZE > 0) { // possible overflow
int minCap = oldCap + 1;
if (minCap < 0 || minCap > MAX_ARRAY_SIZE)
throw new OutOfMemoryError();
newCap = MAX_ARRAY_SIZE;
}
// 如果 queue != array,那么说明有其他线程给 queue 分配了其他的空间
if (newCap > oldCap && queue == array)
// 分配一个新的大数组
newArray = new Object[newCap];
} finally {
// 重置,也就是释放锁
allocationSpinLock = 0;
}
}
// 如果有其他的线程也在做扩容的操作
if (newArray == null) // back off if another thread is allocating
Thread.yield();
// 重新获取锁
lock.lock();
// 将原来数组中的元素复制到新分配的大数组中
if (newArray != null && queue == array) {
queue = newArray;
System.arraycopy(array, 0, newArray, 0, oldCap);
}
}
下面,我们来分析下入队操作 put 方法和出队操作 take 方法。1
2
3
4
5
6
7
8
9
10
11
12
13
14
15
16
17
18
19
20
21
22
23
24
25
26
27
28
29
30
31
32
33
34
35
36
37
38
39
40
41
42
43
44
45
46
47
48
49
50
51
52
53
54
55
56
57
58
59
60
61
62
63
64
65
66
67
68
69
70
71
72
73// 入队操作
public void put(E e) {
// 直接调用 offer 方法,因为前面我们也说了,在这里,put 方法不会阻塞
offer(e);
}
public boolean offer(E e) {
if (e == null)
throw new NullPointerException();
final ReentrantLock lock = this.lock;
// 首先获取到独占锁
lock.lock();
int n, cap;
Object[] array;
// 如果当前队列中的元素个数 >= 数组的大小,那么需要扩容了
while ((n = size) >= (cap = (array = queue).length))
tryGrow(array, cap);
try {
Comparator<? super E> cmp = comparator;
// 节点添加到最小堆中
if (cmp == null)
siftUpComparable(n, e, array);
else
siftUpUsingComparator(n, e, array, cmp);
// 更新 size
size = n + 1;
// 唤醒等待的读线程
notEmpty.signal();
} finally {
lock.unlock();
}
return true;
}
// 出队操作
public E take() throws InterruptedException {
final ReentrantLock lock = this.lock;
// 独占锁
lock.lockInterruptibly();
E result;
try {
// dequeue 出队
while ( (result = dequeue()) == null)
notEmpty.await();
} finally {
lock.unlock();
}
return result;
}
private E dequeue() {
int n = size - 1;
if (n < 0)
return null;
else {
Object[] array = queue;
// 取出队头
E result = (E) array[0];
// 取出队尾,调整时放到队头
E x = (E) array[n];
// 队尾置空
array[n] = null;
Comparator<? super E> cmp = comparator;
if (cmp == null)
// 使用 Comparable 调整最小堆
siftDownComparable(0, x, array, n);
else
// 使用 Comparator 调整最小堆
siftDownUsingComparator(0, x, array, n, cmp);
size = n;
return result;
}
}
可以看出, put 和 take 都是基于最小堆操作的。
4、DelayQueue
DelayQueue 的功能在某种程度上和 PriorityBlockingQueue 有点类似。在 PriorityBlockingQueue 中元素会按照优先级排序,而在 DelayQueue 中,元素的优先级被固定为可取出的时间。队列中的元素按可取时间排序,越早的越靠前。DelayQueue 的排序功能依赖 PriorityQueue 实现,这个队列我们提到过,是 PriorityBlockingQueue 的非线程安全版。但和 PriorityBlockingQueue 不一样的是,当有线程从 DelayQueue 中取元素(take)时,会被阻塞一直到队首元素可取出。DelayQueue 可以被用于以下地方:
- 缓存系统的设计:可以用 DelayQueue 保存缓存元素的有效期,使用一个线程循环查询 DelayQueue,一旦能从 DelayQueue 中获取元素时,表示缓存有效期到了。
- 定时任务调度。使用 DelayQueue 保存当天将会执行的任务和执行时间,一旦从 DelayQueue 中获取到任务就开始执行,从比如 TimerQueue 就是使用 DelayQueue 实现的。
我们看一下入队操作 take 的实现:1
2
3
4
5
6
7
8
9
10
11
12
13
14
15
16
17
18
19
20
21
22
23
24
25
26
27
28
29
30
31
32
33
34
35
36
37
38
39public E take() throws InterruptedException {
// 所有 public 方法的同步由 lock 保障
final ReentrantLock lock = this.lock;
lock.lockInterruptibly();
try {
for (;;) {
E first = q.peek();
if (first == null)
// 队列为空,要等待有元素入队
available.await();
else {
// 获取队首元素的可取时间距离当前时间的间隔
long delay = first.getDelay(NANOSECONDS);
if (delay <= 0)
// 可取时间早于当前时间,直接取出
return q.poll();
first = null; // don't retain ref while waiting
if (leader != null)
// 有其它更早的线程,当前线程等待
available.await();
else {
Thread thisThread = Thread.currentThread();
leader = thisThread;
try {
// 有限等待,等到队首元素可取
available.awaitNanos(delay);
} finally {
if (leader == thisThread)
leader = null;
}
}
}
}
} finally {
if (leader == null && q.peek() != null)
available.signal();
lock.unlock();
}
}
getDelay 是一个需要队列中的元素自己实现的接口,我们以 ScheduledThreadPoolExecutor 里 ScheduledFutureTask 类为例。这个类实现了 Delayed 接口:1
2
3
4
5
6
7
8
9
10
11ScheduledFutureTask(Runnable r, V result, long ns, long period) {
super(r, result);
this.time = ns; // 这个 time 就是可取时间
this.period = period;
this.sequenceNumber = sequencer.getAndIncrement();
}
public long getDelay(TimeUnit unit) {
// 返回的是可取时间 - 当前时间
return unit.convert(time - now(), TimeUnit.NANOSECONDS);
}
5、SynchronousQueue
SynchronousQueue 是一个不存储元素的阻塞队列。每一个 put 操作必须等待一个 take 操作,否则不能继续添加元素。SynchronousQueue 可以看成是一个传球手,负责把生产者线程处理的数据直接传递给消费者线程。队列本身并不存储任何元素,非常适合于传递性场景,比如在一个线程中使用的数据,传递给另外一个线程使用,SynchronousQueue 的吞吐量高于 LinkedBlockingQueue 和 ArrayBlockingQueue。
6、LinkedTransferQueue
LinkedTransferQueue 是一个由链表结构组成的无界阻塞 TransferQueue 队列。TransferQueue 队列继承了 BlockingQueue,在 BlockingQueue 的基础上多了 tryTransfer 和 transfer 方法。transfer 会在元素进入阻塞队列前,先判断有没有消费者线程在等待获取,若有,则直接移交;否则将元素插入到队列尾部。tryTransfer 相比 transfer 少了插入的步骤,多了返回值 boolean,即若当前没有消费者线程空闲,则直接返回 false,不会插入到阻塞队列。
7、LinkedBlockingDeque
LinkedBlockingDeque 是一个由链表结构组成的双向阻塞队列。所谓双向队列指的你可以从队列的两端插入和移出元素。双端队列因为多了一个操作队列的入口,在多线程同时入队时,也就减少了一半的竞争。相比其他的阻塞队列,LinkedBlockingDeque 多了 addFirst,addLast,offerFirst,offerLast,peekFirst,peekLast 等方法,以 First 单词结尾的方法,表示插入,获取(peek)或移除双端队列的第一个元素。以 Last 单词结尾的方法,表示插入,获取或移除双端队列的最后一个元素。另外插入方法 add 等同于 addLast,移除方法 remove 等效于 removeFirst。但是 take 方法却等同于 takeFirst,不知道是不是 Jdk 的 bug,使用时还是用带有 First 和 Last 后缀的方法更清楚。在初始化 LinkedBlockingDeque 时可以初始化队列的容量,用来防止其再扩容时过渡膨胀。另外双向阻塞队列可以运用在“工作窃取”模式中。
三、阻塞队列的实现原理
通过上面的分析我们知道了,阻塞队列之所以能实现获取队列元素但是队列为空时,会阻塞等待队列中有元素再返回和添加元素时,如果队列已满,那么等到队列可以放入新元素时再放入这两种功能,主要依赖于 AQS 提供的 Condition 这个工具。当队列满时,我们可以让线程 await 于一个 notFull Condition,它会等待另一个线程的 notFull signal;当队列空时,我们可以让线程 await 于一个 notEmpty Condition,它会等待另一个线程的 notEmpty signal。那么 Condition 的 await 和 signal 在底层是怎么实现的呢?先来看一下 await 的源码:1
2
3
4
5
6
7
8
9
10
11
12
13
14
15
16
17
18
19
20
21
22
23
24// await
public final void await() throws InterruptedException {
if (Thread.interrupted())
throw new InterruptedException();
// 加入等待队列
Node node = addConditionWaiter();
// 释放同步状态(锁)
int savedState = fullyRelease(node);
int interruptMode = 0;
// 判断节点是否在同步队列中
while (!isOnSyncQueue(node)) {
// 核心部分,阻塞(和 Object.wait(0) 一样进入无限等待状态)
LockSupport.park(this);
if ((interruptMode = checkInterruptWhileWaiting(node)) != 0)
break;
}
// 退出 while 循环说明节点被 signal() 调入同步队列中,调用 acquireQueued() 加入同步状态竞争,竞争到锁后从 await() 方法返回
if (acquireQueued(node, savedState) && interruptMode != THROW_IE)
interruptMode = REINTERRUPT;
if (node.nextWaiter != null) // clean up if cancelled
unlinkCancelledWaiters();
if (interruptMode != 0)
reportInterruptAfterWait(interruptMode);
}
同步队列是 AQS 提供的等待同一个 Lock 的数据结构,等待队列也是 AQS 提供的用于等待同一个 Condition 的数据结构,它们的关系如图:
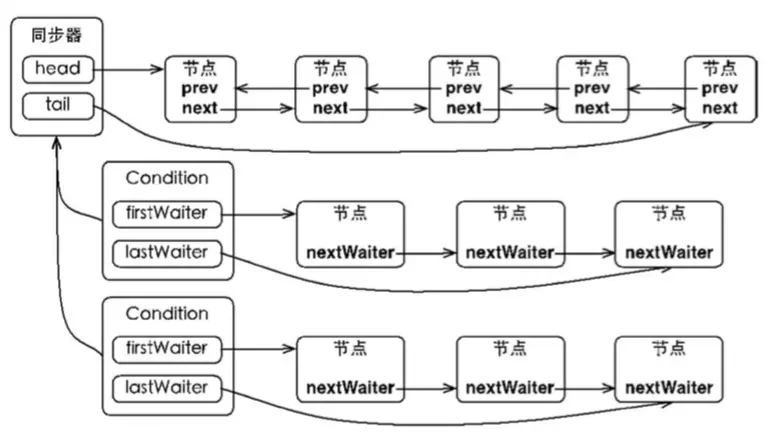
一个 Lock 底下可以挂载多个 Condition,这些 Condition 之间彼此独立。当 await 调用时,相应的节点会从同步队列中取下,放入等待队列中。当 signal 被调用时,等待队列的队首节点会被取出,重新加入同步队列中;当 signalAll 被调用时,等待队列的所有节点会被取出,加入同步队列。
await 方法的核心部分是第 13 行的 LockSupport.park() 函数,该函数表示阻塞当前线程,它的源码如下:1
2
3
4
5
6
7public static void park(Object blocker) {
Thread t = Thread.currentThread();
setBlocker(t, blocker);
// 核心部分
UNSAFE.park(false, 0L);
setBlocker(t, null);
}
函数的核心部分是第 5 行 UNSAFE.park() 函数,这是一个 native 方法,park 这个方法会阻塞当前线程,只有以下四种情况中的一种发生时,该方法才会返回。
- 与 park 对应的 unpark 执行或已经执行时。
- 线程被中断时。
- 如果参数中的 time 不是零,等待了指定的毫秒数时。
- 发生异常现象时。这些异常事先无法确定。
JVM 中 park 在不同的操作系统使用不同的方式实现,在 linux 下是使用的是系统方法 pthread_cond_wait 实现。1
2
3
4
5
6
7
8
9
10
11
12
13
14
15
16
17
18
19
20
21
22
23
24
25
26
27
28
29
30
31
32void os::PlatformEvent::park() {
int v ;
for (;;) {
v = _Event ;
if (Atomic::cmpxchg (v-1, &_Event, v) == v) break ;
}
guarantee (v >= 0, "invariant") ;
if (v == 0) {
// Do this the hard way by blocking ...
int status = pthread_mutex_lock(_mutex);
assert_status(status == 0, status, "mutex_lock");
guarantee (_nParked == 0, "invariant") ;
++ _nParked ;
while (_Event < 0) {
// 核心部分
status = pthread_cond_wait(_cond, _mutex);
// for some reason, under 2.7 lwp_cond_wait() may return ETIME ...
// Treat this the same as if the wait was interrupted
if (status == ETIME) { status = EINTR; }
assert_status(status == 0 || status == EINTR, status, "cond_wait");
}
-- _nParked ;
// In theory we could move the ST of 0 into _Event past the unlock(),
// but then we'd need a MEMBAR after the ST.
_Event = 0 ;
status = pthread_mutex_unlock(_mutex);
assert_status(status == 0, status, "mutex_unlock");
}
guarantee (_Event >= 0, "invariant") ;
}
}
pthread_cond_wait 是一个多线程的条件变量函数,_cond 是 condition 的缩写,字面意思可以理解为线程在等待一个条件发生,这个条件是一个全局变量。这个方法接收两个参数,一个共享变量_cond,一个互斥量_mutex。调用后它会阻塞直到另一个线程调用 pthread_cond_signal 方法,它会唤醒一个等待 _cond 的线程。这也是 signal 的原理,下面是 signal 的源码:1
2
3
4
5
6
7
8
9
10
11
12
13
14
15
16
17
18
19
20
21
22
23
24
25
26
27
28
29
30
31
32
33
34
35
36
37
38public final void signal() {
if (!isHeldExclusively())
throw new IllegalMonitorStateException();
// first 指向等待队列的首节点
Node first = firstWaiter;
if (first != null)
// 实际执行的方法
doSignal(first);
}
private void doSignal(AbstractQueuedSynchronizer.Node first) {
do {
if ( (firstWaiter = first.nextWaiter) == null)
lastWaiter = null;
first.nextWaiter = null;
// 找到第一个状态不为 CANCELLED 的节点(这个状态的原因是超时或中断)
// transferForSignal 是核心方法
} while (!transferForSignal(first) &&
(first = firstWaiter) != null);
}
final boolean transferForSignal(Node node) {
// 这里返回 false 的条件是 node 的状态为 CANCELLED
if (!compareAndSetWaitStatus(node, Node.CONDITION, 0))
return false;
Node p = enq(node);
int ws = p.waitStatus;
if (ws > 0 || !compareAndSetWaitStatus(p, ws, Node.SIGNAL))
// 核心方法
LockSupport.unpark(node.thread);
return true;
}
public static void unpark(Thread thread) {
if (thread != null)
// 核心方法
UNSAFE.unpark(thread);
}
这里又看到了一个 UNSAFE 方法,说明这是一个 JNI 方法,在 Linux 下的实现为:1
2
3
4
5
6
7
8
9
10
11
12
13
14
15
16
17
18
19
20
21
22
23void Parker::unpark() {
int s, status ;
status = pthread_mutex_lock(_mutex);
assert (status == 0, "invariant") ;
s = _counter;
_counter = 1;
if (s < 1) {
if (WorkAroundNPTLTimedWaitHang) {
// 核心部分
status = pthread_cond_signal (_cond) ;
assert (status == 0, "invariant") ;
status = pthread_mutex_unlock(_mutex);
assert (status == 0, "invariant") ;
} else {
status = pthread_mutex_unlock(_mutex);
assert (status == 0, "invariant") ;
status = pthread_cond_signal (_cond) ;
assert (status == 0, "invariant") ;
}
} else {
pthread_mutex_unlock(_mutex);
assert (status == 0, "invariant") ;
}
我们看到果然是调用了pthread_cond_signal,从而把阻塞在 _cond 上的一个线程唤醒。同理还有 pthread_cond_broadcast 函数,它会唤醒所有阻塞在 _cond 上的线程,这也是 signalAll 的原理。