从根本上来讲 Spring Boot 就是一些库的集合,是一个基于“约定优于配置”的原则,快速搭建应用的框架。本质上依然是 Spring,在这之上帮我们省去了很多样板化的配置,使得我们能够更专注于应用程序功能的开发。
Spring Boot 将很多魔法带入了 Spring 应用程序的开发之中,其中最重要的是以下四个核心:
- 自动配置:Spring Boot 会基于你的 classpath 中的 jar 包,试图猜测和配置你可能需要的 bean。
- 起步依赖:本质上是一个 Maven 项目对象模型,定义了对其他库的传递依赖,这些东西加在一起即支持某项功能(比如 mybatis-spring-boot-starter 中整合了 jdbc、mybatis、spring-mybatis 等多种依赖,这些依赖共同提供了 mybatis 这一功能)。
- 内置容器:嵌入了 Tomcat、Jetty 等 Servlet 容器,应用可以不用打包成 War 格式,而是可以直接以 Jar 格式运行。
- 应用监控:提供了一整套的对应用状态的监控与管理的功能模块(通过引入 spring-boot-starter-actuator),包括应用的线程信息、内存信息、应用是否处于健康状态等,为了满足更多的资源监控需求。
本文主要讲述自动配置和起步依赖这两个特性的实现原理,这两个特性也是 Spring Boot 开箱即用的重要保证。所谓开箱即用是指,在 Spring Boot 中,对于大部分的功能(比如 web、mybatis、redis 等),只需要引入一个 starter 包和少量的配置就能使用,不需要像以前一样引入很多 jar 包->注入很多 bean->在 bean 中配置很多属性。
我们通过对比在 Spring 中引入 Mybatis 的流程来说明这两个特性带来的开发体验提升。
一、原生 Spring 引入 Mybatis
回忆一下,在原生 Spring 中引入 Mybatis 的步骤:
1、引入 jar 包
1 | <!-- MyBatis依赖 --> |
2、配置和注入 bean
首先配置 DataSource:1
2
3
4
5
6
7
8
9
10
11
12
13
14<bean id="dataSource" class="org.springframework.jdbc.datasource.DriverManagerDataSource">
<property name="driverClassName">
<value>${driver}</value>
</property>
<property name="url">
<value>${url}</value>
</property>
<property name="username">
<value>${username}</value>
</property>
<property name="password">
<value>${password}</value>
</property>
</bean>
然后配置 SqlSessionFactory 并将 DataSource 注入:
1 | <bean id="sqlSessionFactory" class="org.mybatis.spring.SqlSessionFactoryBean"> |
最后配置自动扫描,将 Mapper 接口生成的代理注入到 Spring:
1 | <bean class="org.mybatis.spring.mapper.MapperScannerConfigurer"> |
二、起步依赖
起步依赖通过把同一功能下的大量 jar 包封装成一个 starter 包的形式降低了依赖的复杂度。
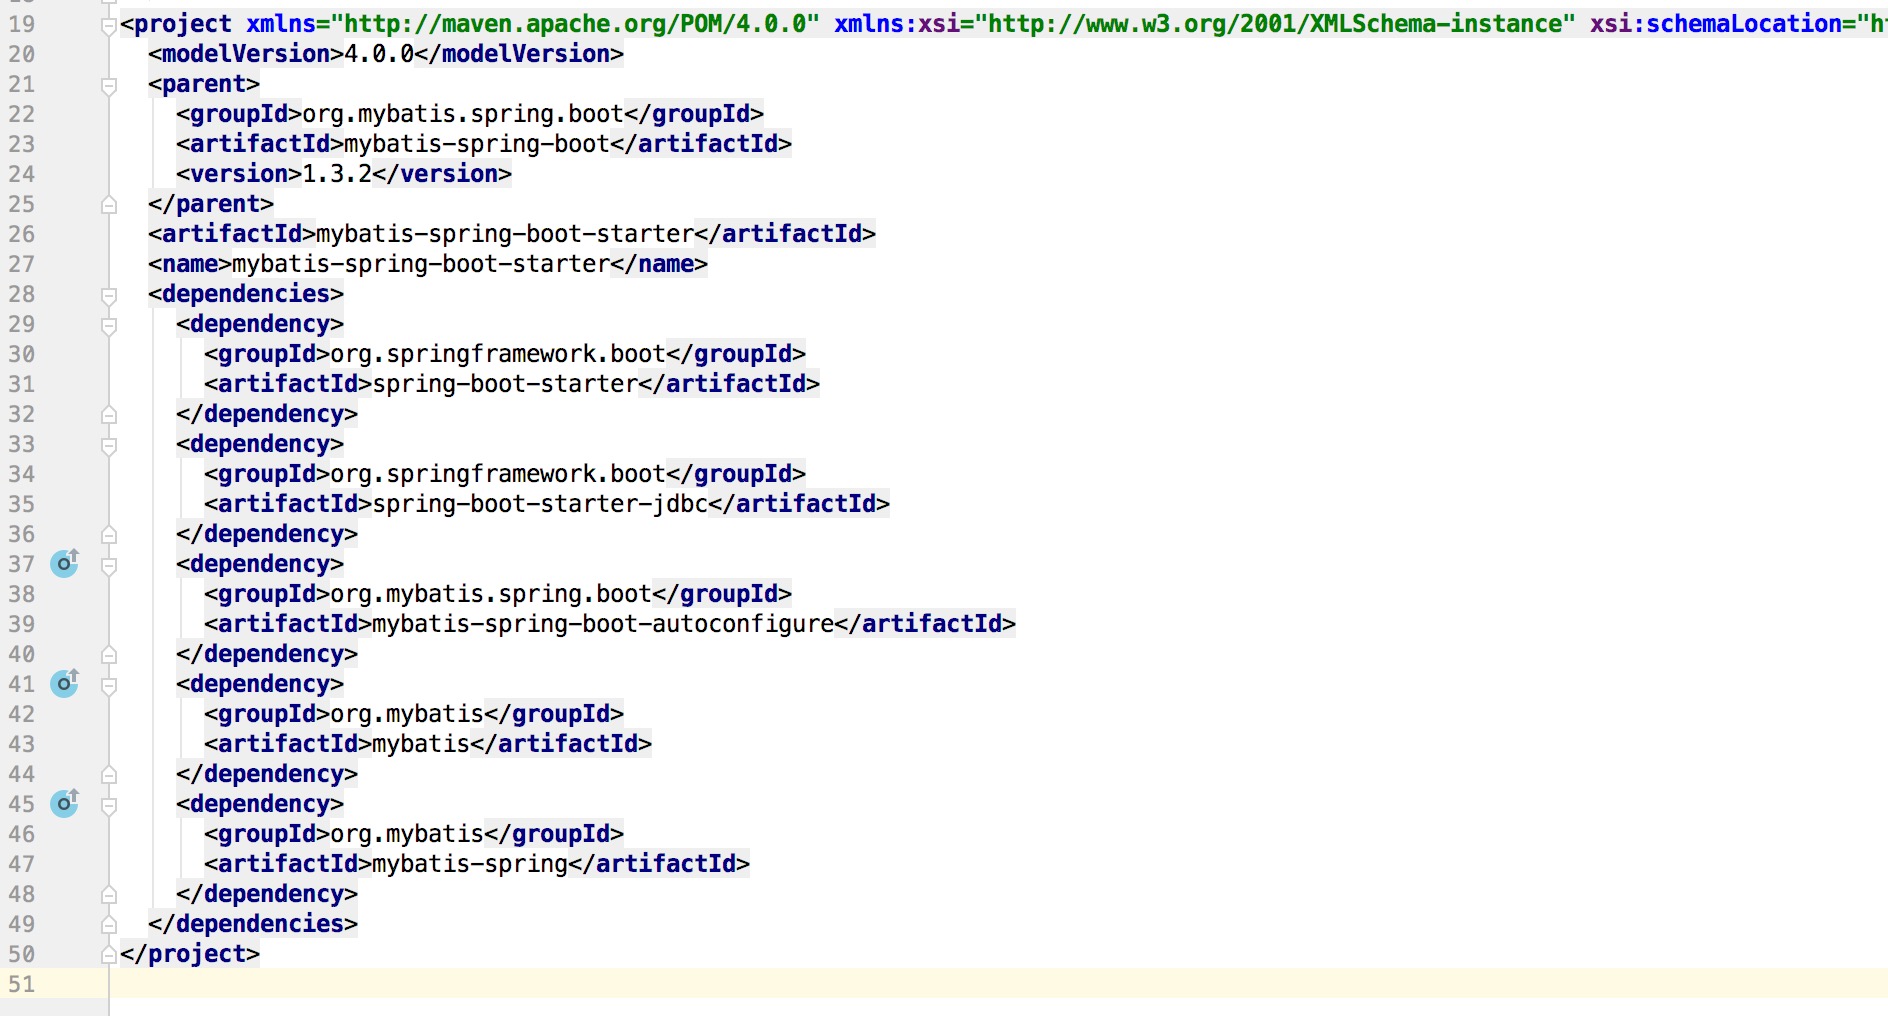
在 Spring Boot 中,我们只需要引入一个 mybatis-spring-boot-starter 包就可以引入 Mybatis 所需的所有 jar 包(左边原生,右边 Spring Boot):

这样做的好处有两个,第一是将包按照功能整合后,减少了 pom 文件的复杂度,而且 starter 包表意明确,一般是一个功能对应一个包,不需要开发人员记忆大量的包依赖;第二是版本号管理,当我们需要为项目添加一个新的依赖时,不需要再去纠结选择的版本号是否合适,因为 Spring Boot 官方提供的起步依赖都和 Spring Boot 版本紧密相连,为我们传递的第三方依赖是经过足够测试后敲定下来最合适的版本。
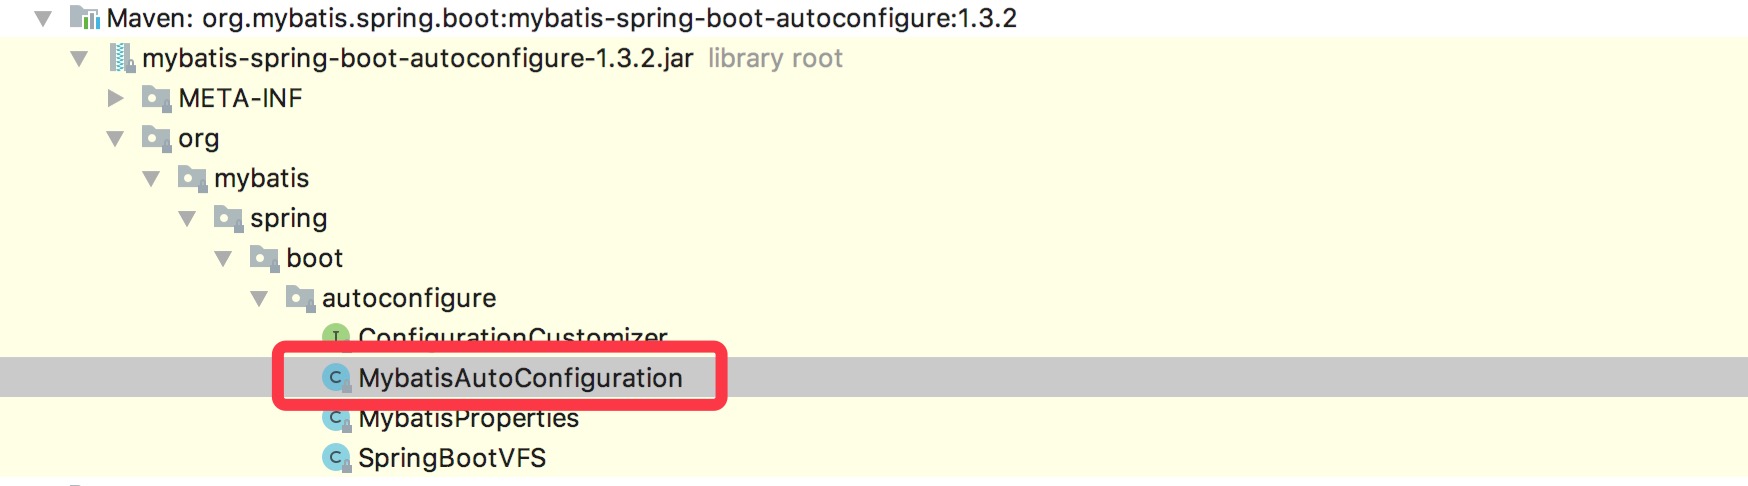
那么这个功能是怎么实现的呢?我们点击 mybatis-spring-boot-starter 进去,发现里面是一些包的集合:
所以起步依赖就是将用于实现某个功能的 jar 包统一整合进 starter 包中,我们需要引入某个功能的时候,直接引入该 starter 包就行了。当然,整合进 starter 包的 jar 包都是经过足够测试敲定下来的,这也避免了某些版本的包不兼容的情况。
三、自动配置
在原生方式中,引入 jar 包后我们还要进行 bean 的配置和注入,而在 Spring Boot 中,我们只需要在全局的配置文件 application.properties 中加几行就行:
1 | spring.datasource.driverClassName = com.mysql.jdbc.Driver |
相比于原生的方式,Spring Boot 中不再需要手动注入 dataSource 和 sqlSessionFactory 等相关的 bean,那么这些 bean 是在哪里被配置并且注入的呢?
1、基于注解的 bean 配置
以 Mybatis 为例,我们发现 mybatis-spring-boot-starter 这个包帮我们引入了 mybatis-spring-boot-autoconfigure 这个包,如下图:
里面有 MybatisAutoConfiguration 这个类,打开这个类看看有什么东西:
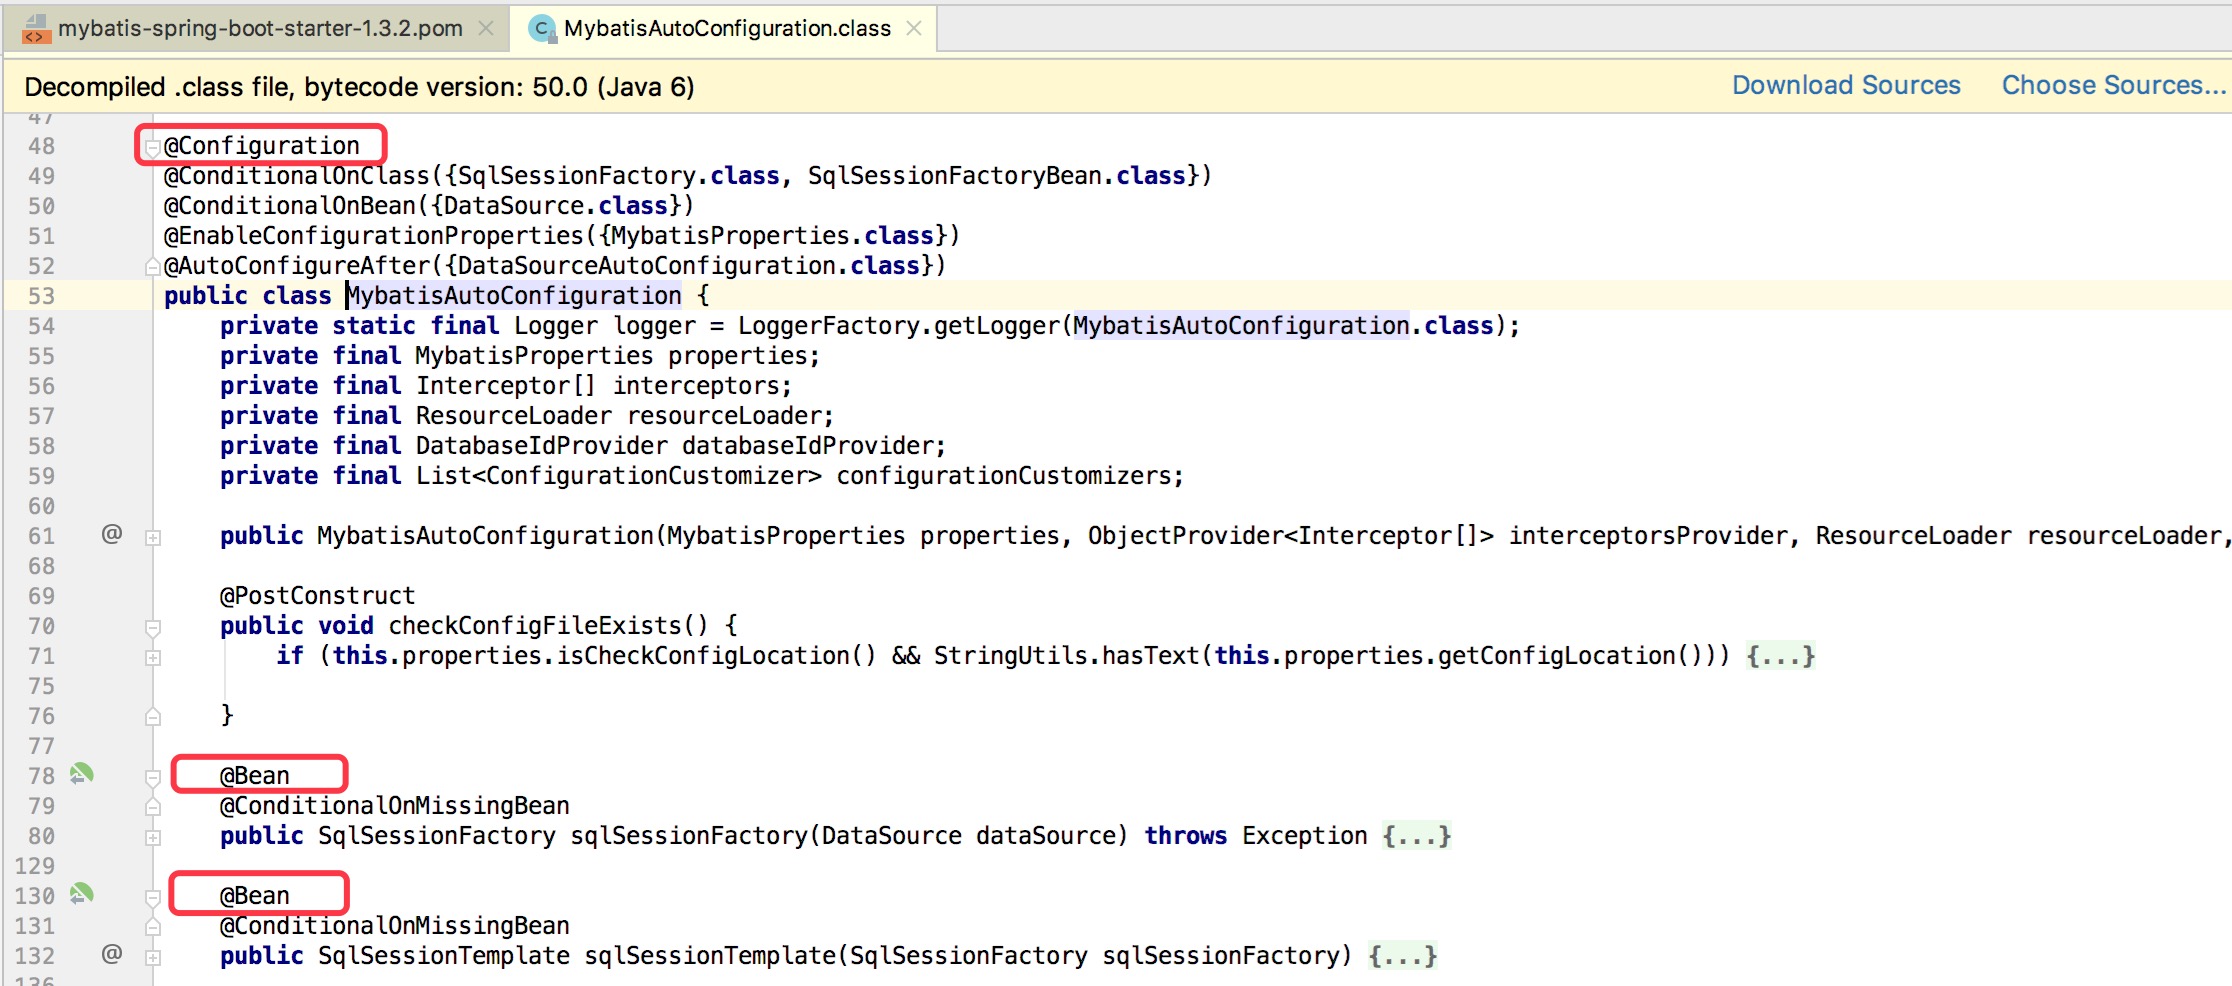
熟悉 @Configuration、@Bean 这两个注解的同学或许已经知道了,这两个注解一起使用就可以创建一个基于 java 代码的配置类,可以用来替代相应的 xml 配置文件。
2、bean 参数获取
我们看到了 bean 配置的地方,但是还没有看到 Spring Boot 是如何读取 application.properties 这个配置文件的。
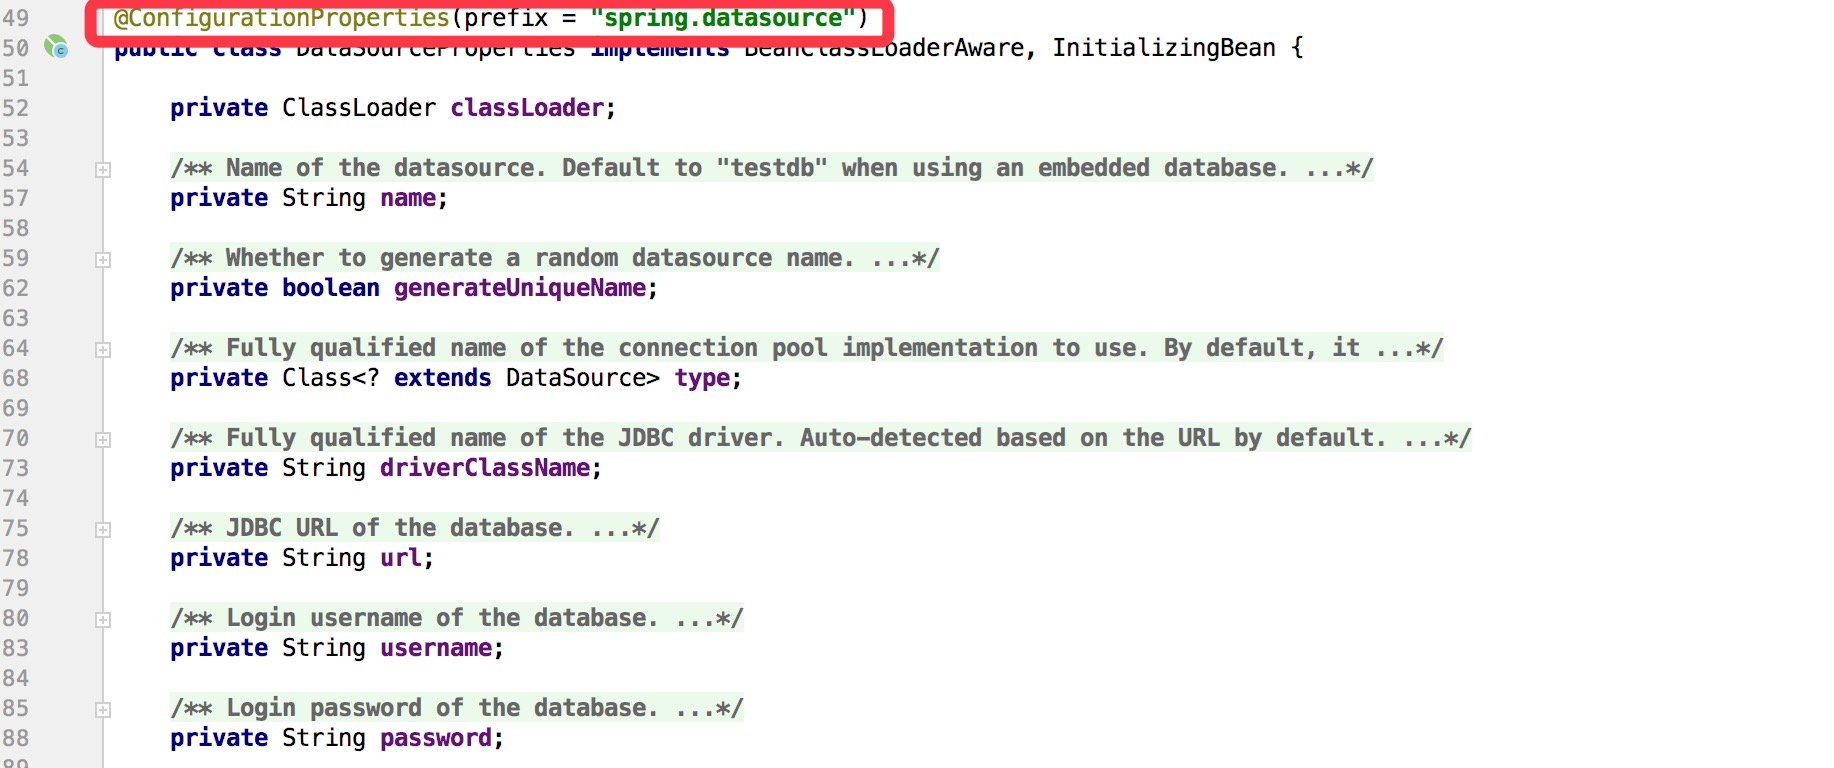
在 DataSourceAutoConfiguration 类里面,我们注意到使用了 @EnableConfigurationProperties 这个注解:

DataSourceProperties 中封装了数据源的各个属性,且使用了注解 @ConfigurationProperties 指定了配置文件的前缀,这个注解会自动去寻找 application.properties 这个文件中前缀为指定前缀的配置项,并把值注入到配置类的同名属性中:
最后这个 DataSourceProperties 被 Spring Boot 默认的数据源 HikariDataSource 使用:
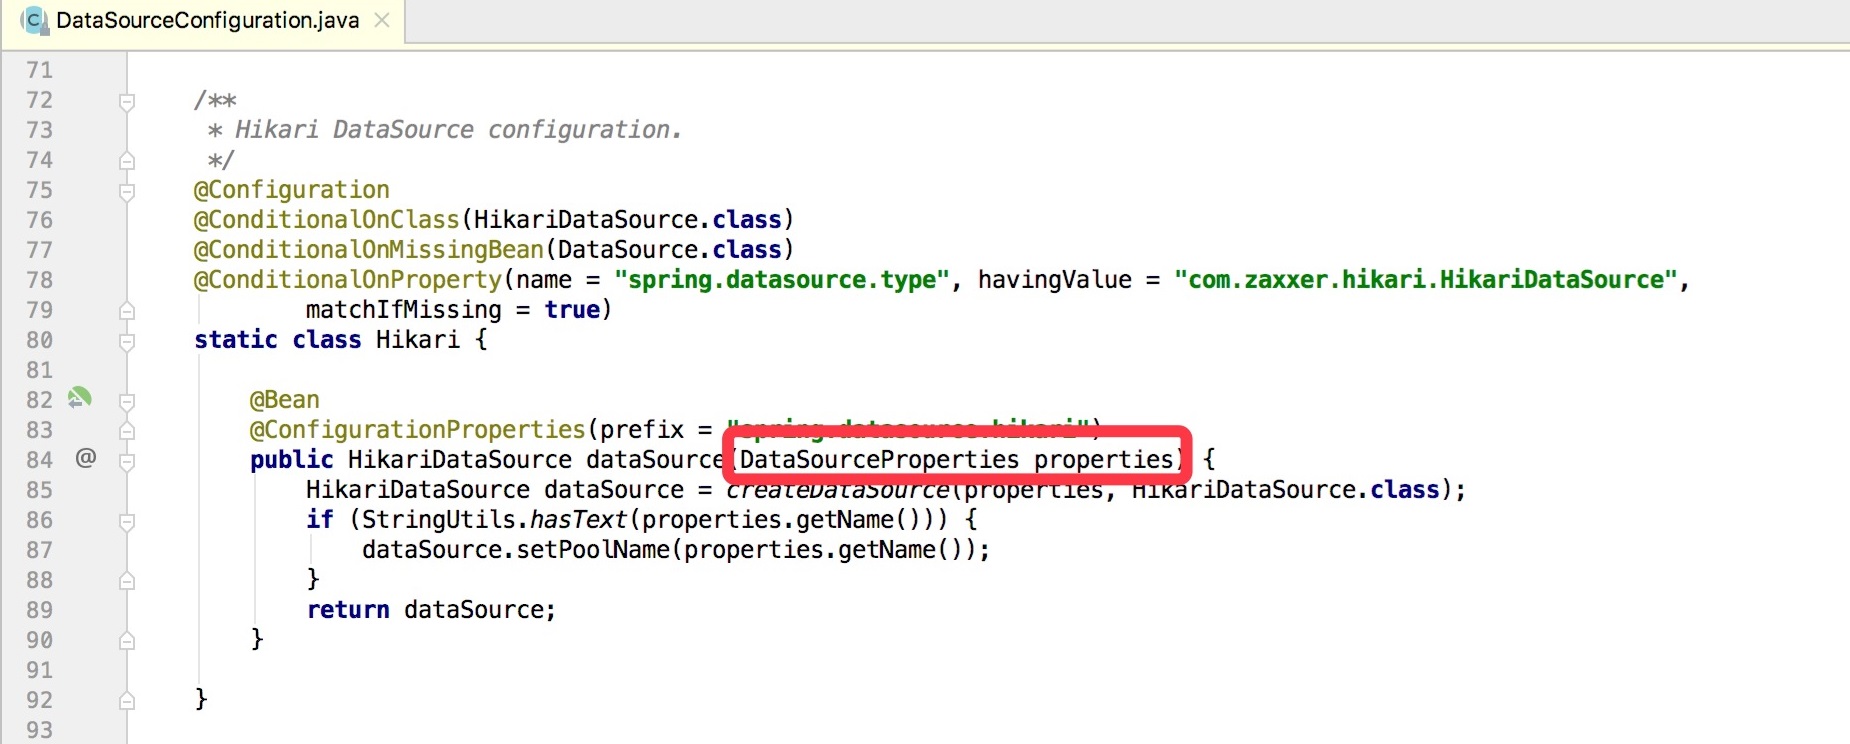
到这里我们可以总结出:application.properties 中的配置通过 @ConfigurationProperties 注解被读取到相应的配置类中,这些配置类又被各种 bean 读取,最终把配置传递到实际的 bean 中。
3、bean 发现
Spring Boot 默认扫描启动类所在的包下的主类与子类的所有组件,但并没有包括依赖包的中的类,那么依赖包中的 bean 是如何被发现的呢?
这就要从 @SpringBootApplication 这个注解说起了。我们通常在启动类中加 @SpringBootApplication 这个注解:

点进去看:

实际上重要的注解只有三个:
- @Configuration 的作用我们已经知道了,被注解的类将成为一个 bean 配置类。
- @ComponentScan 的作用我们也比较熟悉,自动扫描并加载符合条件的组件。
- @EnableAutoConfiguration 这个注解的功能很重要,它借助 @Import 的支持,收集和注册依赖包中相关的 bean 定义,这也是自动配置的关键所在。

如上源码,@EnableAutoConfiguration 注解引入了 @AutoConfigurationPackage 和 @Import 这两个注解。
@AutoConfigurationPackage 这个注解不是本文的重点,但也跟自动配置相关。这个注解要放在配置类上,会把当前配置类所在的包名放进一个全局的数组里。这些包名会被 org.springframework.boot.autoconfigure 下的一些配置类扫描,从而进行自动配置。这个功能看上去跟 @ComponentScan 有点像,但两者是有很大区别的:@ComponentScan 是 Spring Core 下的注解,作用是扫描到标记 @Component 的类然后将其加入 Spring 容器;@AutoConfigurationPackage 是 Spring Boot 下的注解,作用是为 org.springframework.boot.autoconfigure 下的一些配置类提供扫描的路径,但具体的行为由配置类自己决定。
回到正题,我们实际要关心的是 @Import 这个注解。这个注解注入了一个类型为 AutoConfigurationImportSelector 的 bean,先看这个类的继承关系:
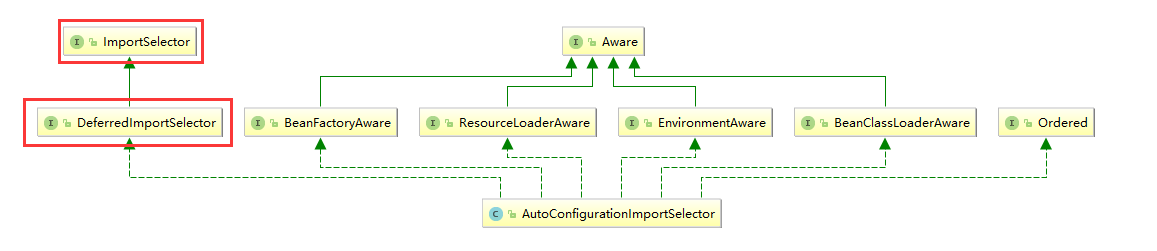
特别关注红框框起来的两个接口:ImportSelector 和 DeferredImportSelector。Spring 允许用户在配置类中使用 @Import 自行导入所需的类,而 @Import 有四种用法:
- 1、导入一个普通类。
- 2、导入一个标记了 @Configuration 的类,将该类以实例工厂的方式导入标记 @Bean 的方法的返回值。
- 3、导入一个 ImportBeanDefinitionRegistrar 的子类,该类可以获取到当前配置类(@Import 所在的类一定是配置类)的元数据信息,比如类全名和所在的包名,然后进行一些自定义的 bean 注册(上文的 @AutoConfigurationPackage 就是通过这种方式实现的)。
- 4、导入一个 ImportSelector 的子类,该类的 selectImports 方法返回一个类全名的数组,根据返回的类全名会注册相应的 bean。
自动配置导入依赖包的中的类所用的方法就是 ImportSelector 这种方法。
如继承关系图所示,AutoConfigurationImportSelector 实现了 DeferredImportSelector 接口,而 DeferredImportSelector 是 ImportSelector 的子接口。DeferredImportSelector 和 ImportSelector 的区别在于执行的时机。 ImportSelector 实例的 selectImports 方法的执行时机在 @Configuration 注解中的其他逻辑(@ImportResource、@Bean)被处理之前;而 DeferredImportSelector 实例的 selectImports 方法的执行时机则是在 @Configguration 注解中的其他逻辑被处理完毕之后:
1 | class ConfigurationClassParser { |
那么自动配置为什么要使用 DeferredImportSelector 而不是 ImportSelector 呢?这是因为在自动配置的时候需要通过判断容器中有没有特定的 bean 来判断一个配置类是否要被注册,如果自动配置的逻辑在其它逻辑之前,此时容器中注册的 bean 还不全,会导致该注册的配置类没有被注册,因此自动配置要在其它逻辑之后。
现在我们来看一下 AutoConfigurationImportSelector 的 selectImports 方法:1
2
3
4
5
6
7
8
9
10
11
12
13
14
15
16
17
18
19
20
21
22
23
24
25
26
27
28
29
30
31
32
33
34
35
36
37
38
39public class AutoConfigurationImportSelector implements DeferredImportSelector, BeanClassLoaderAware, ResourceLoaderAware, BeanFactoryAware, EnvironmentAware, Ordered {
private static final String[] NO_IMPORTS = new String[0];
// ...
// 实现 DeferredImportSelector 接口的 selectImports 方法
public String[] selectImports(AnnotationMetadata annotationMetadata) {
if(!this.isEnabled(annotationMetadata)) {
return NO_IMPORTS;
} else {
AutoConfigurationMetadata autoConfigurationMetadata = AutoConfigurationMetadataLoader
.loadMetadata(this.beanClassLoader);
AnnotationAttributes attributes = this.getAttributes(annotationMetadata);
// 获取所有自动配置的配置类列表(核心)
List<String> configurations = this.getCandidateConfigurations(annotationMetadata, attributes);
// 去除重复的配置类
configurations = this.removeDuplicates(configurations);
// 获取应该被排除的配置类列表
Set exclusions = this.getExclusions(annotationMetadata, attributes);
this.checkExcludedClasses(configurations, exclusions);
// 排除所有应该被排除的配置类
configurations.removeAll(exclusions);
// 筛选,选出满足条件的配置类(核心)
configurations = this.filter(configurations, autoConfigurationMetadata);
this.fireAutoConfigurationImportEvents(configurations, exclusions);
// 返回列表
return StringUtils.toStringArray(configurations);
}
}
// ...
protected List<String> getCandidateConfigurations(AnnotationMetadata metadata, AnnotationAttributes attributes) {
// 从 classpath 目录下所有的 jar 包中读取 META-INF/spring.factories 文件信息,获取配置类列表
List<String> configurations = SpringFactoriesLoader.loadFactoryNames(EnableAutoConfiguration.class,
this.getBeanClassLoader());
return configurations;
}
}
AutoConfigurationImportSelector 下的 getCandidateConfigurations 会返回所有自动配置的配置类列表,这主要借助于一个 Spring 内部的工具类 SpringFactoriesLoader 来实现。SpringFactoriesLoader 的 loadFactoryNames 方法会从 classpath 目录下所有的 jar 包中读取 META-INF/spring.factories 文件信息,然后从中选出 key 为传入类的类全名的 value,将 value 合并成一个列表返回:
1 | public static List<String> loadFactoryNames(Class<?> factoryClass, @Nullable ClassLoader classLoader) { |
最终 AutoConfigurationImportSelector 获取的是 classpath 目录下所有 META-INF/spring.factories 文件中 key 为 org.springframework.boot.autoconfigure.EnableAutoConfiguration 的 value 合并而成的一个列表。
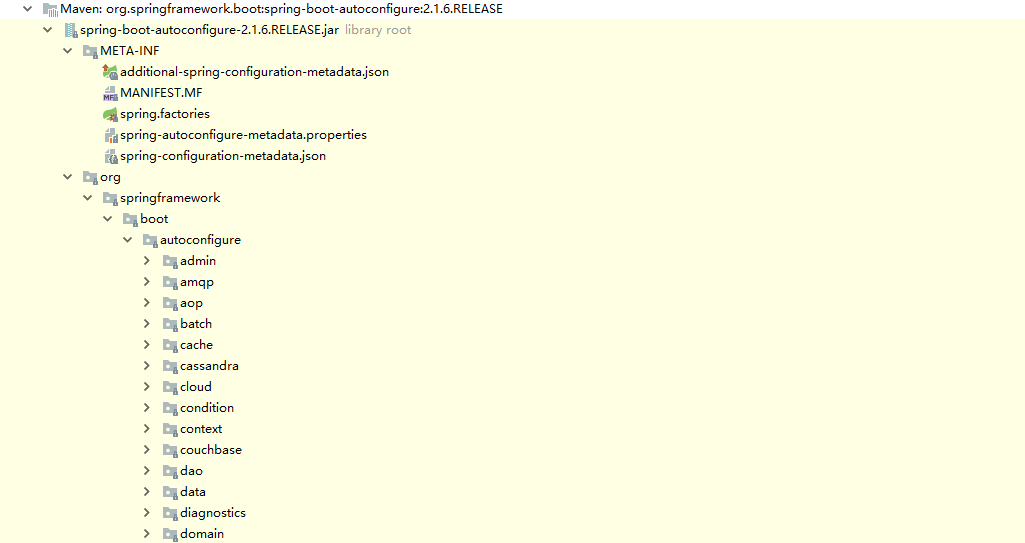
我们来简单看一下位于 spring-boot-autoconfigure-2.1.6.RELEASE.jar 包下的 META-INF/spring.factories 文件:
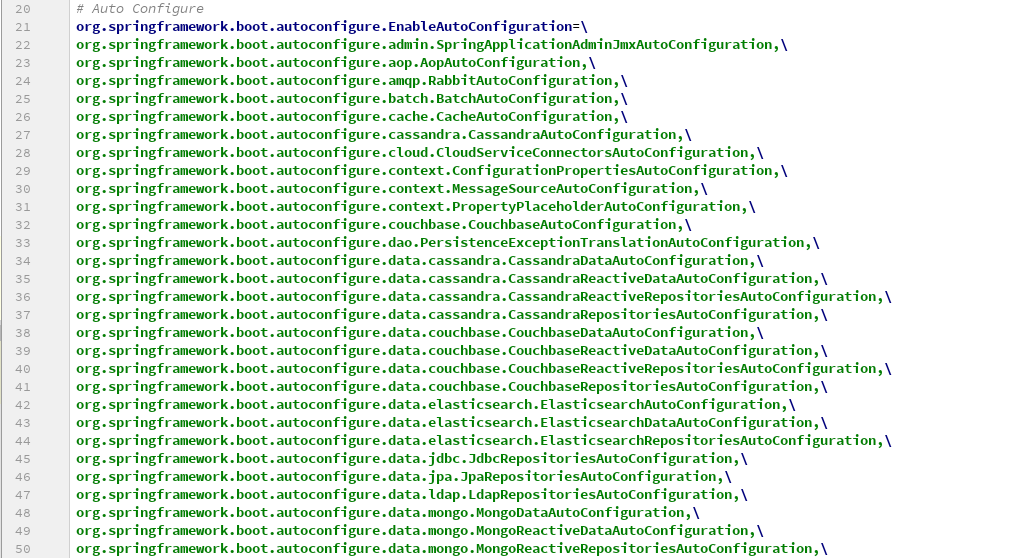
发现里面罗列了很多配置类,那么这些配置类在哪呢?其实同样也在 spring-boot-autoconfigure-2.1.6.RELEASE.jar 这个包里面:
4、bean 筛选
上文我们看到 META-INF/spring.factories 下的配置类还是挺多的,里面有 aop、amp、jdbc、mongo 等等。这些配置类几乎涵盖了 Java 中常用的所有功能。我们当然不需要那么多的功能,那么 Spring Boot 又是如何对这些配置类做筛选的呢?
答案是 @ConditionalOnXXX 这类注解。这是 Spring Boot 特有的用于做条件筛选的注解,常见的有:
| 注解 | 作用 |
|---|---|
| @ConditionalOnBean | 仅在容器存在某个 bean 时,才会实例化这个 Bean |
| @ConditionalOnClass | 某个 class 位于类路径上,才会实例化这个 Bean |
| @ConditionalOnExpression | 当表达式为 true 的时候,才会实例化这个 Bean |
| @ConditionalOnMissingBean | 仅在容器不存在某个 Bean 时,才会实例化这个 Bean |
| @ConditionalOnMissingClass | 某个 class 在类路径上不存在的时候,才会实例化这个 Bean |
| @ConditionalOnNotWebApplication | 不是 web 应用时才会实例化这个 Bean |
我们以 MybatisAutoConfiguration 为例,看一下导入这个配置类的条件:

可以看到要完成 Mybatis 的自动配置,需要在类路径中存在 SqlSessionFactory.class、SqlSessionFactoryBean.class 这两个类,同时需要在容器中存在 DataSource 这个 Bean。
那么这个功能是如何实现的呢?我们找到了 AutoConfigurationImportSelector 下的 filter 方法,这里会对从 spring.factories 读出来的配置类列表进行过滤:
1 | private List<String> filter(List<String> configurations, AutoConfigurationMetadata autoConfigurationMetadata) { |
可以看到 filter 方法会调用各个 AutoConfigurationImportFilter 的 match 方法对配置列表进行筛选,具体的筛选逻辑由各个过滤器实现。我们找到一个名为 OnClassCondition 的过滤器,从名字可以看出这是负责 @ConditionalOnClass 注解的过滤器:
1 | (Ordered.HIGHEST_PRECEDENCE) |
这里过滤器会按照给定的配置类列表,返回一个结果列表,如果某一个配置类对应的结果为空或者为 true,则表示通过,否则表示不通过。为了提高筛选的效率,配置列表被分成两部分,在两个线程中筛选。我们进入实际筛选的代码:
1 | private ConditionOutcome[] getOutcomes(String[] autoConfigurationClasses, int start, int end, |
我们看到实际筛选中,会对每个配置类分别处理,处理的方式是拿到该配置类上 @ConditionalOnClass 注解的属性,属性的值是一串以 , 区隔的该配置类所依赖的类路径上的 class 集合的字符串,过滤器会检查这些 class 是否都存在于类路径下:1
2
3
4
5
6
7
8
9
10
11
12
13private ConditionOutcome getOutcome(String className, ClassLoader classLoader) {
try{
// 如果存在于类路径下,forName不会抛出异常;如果不存在,会抛异常
forName(className, classLoader);
// 检测通过,返回 null
return null;
}
catch (Throwable ex) {
// 检测不通过,返回结果为 false 的 ConditionOutcome
return new ConditionOutcome(false, ConditionMessage.forCondition(ConditionalOnClass.class)
.didNotFind("required class").items(Style.QUOTE, className));
}
}
这里使用反射包下的 forName 方法检测 class 是否存在于类路径下,如果存在于类路径下,forName不会抛出异常;如果不存在,会抛出异常。如果检测通过,返回 null;如果检测不通过,返回结果为 false 的 ConditionOutcome。从上文我们知道,match 方法中,ConditionOutcome 为空或者为 true 都表示通过。
这里我们可以总结一下:bean 过滤的逻辑由 @ConditionalOnXXX 这类注解标识,然后由 Spring Boot 中的各类过滤器解析并处理。以 @ConditionalOnClass 这个注解为例,它的含义是某个 class 位于类路径上时,才会实例化这个 Bean,那么相应的过滤器在检测的时候,会调用 forName 来判断 class 是否存在于类路径上,如果不存在这个 class 就会抛出异常,然后在异常处理流程中给这个配置类打标记,不让它被注册到容器中,以此来实现筛选的功能。
四、总结
起步依赖和自动配置是 Spring Boot 开箱即用的重要保证。
起步依赖通过把同一功能下的大量 jar 包封装成一个 starter 包的形式降低了依赖的复杂度。
自动配置会基于你的 classpath 中的 jar 包,试图猜测和配置你可能需要的 bean。当我们导入一个 starter 包时,所有和这个功能相关的 bean 会以 @Bean 的形式定义在 jar 包的配置类中。启动类中默认会自动引入一个 AutoConfigurationImportSelector,这个选择器会帮我们扫描所有 jar 包下的 META-INF/spring.factories 文件,从文件中可以获取到该 jar 包内所有配置类的列表。但不是所有的配置类都会被引入, @ConditionalOnXXX 注解标志了引入某个配置类的条件。Spring Boot 内部实现了多种过滤器来解析和处理这类注解,AutoConfigurationImportSelector 调用这些过滤器,最终返回一份满足条件的配置类名单,注册到容器中,完成自动配置。
五、参考资料
深入springboot原理——一步步分析springboot启动机制(starter机制)
Spring Boot自动配置的”魔法”是如何实现的?