在创建 Netty-Channel 的时候,我们会创建若干个组件,其中最重要的就是 pipeline 了。pipeline 可以看作是 Netty 的大动脉,所有对 Channel 的读写都要流过 pipeline,而 pipeline 也是 Netty 事件驱动的关键所在。
pipeline 初始化
pipeline 在创建 Channel 的时候被创建:1
2
3
4
5
6
7
8AbstractChannel
protected AbstractChannel(Channel parent) {
this.parent = parent;
id = newId();
unsafe = newUnsafe();
// 创建 pipeline
pipeline = newChannelPipeline();
}
创建的时候会创建 head 和 tail 两个节点:1
2
3
4
5
6
7
8
9
10
11
12
13DefaultChannelPipeline
protected DefaultChannelPipeline(Channel channel) {
this.channel = ObjectUtil.checkNotNull(channel, "channel");
succeededFuture = new SucceededChannelFuture(channel, null);
voidPromise = new VoidChannelPromise(channel, true);
// 创建 head 和 tail 两个节点
tail = new TailContext(this);
head = new HeadContext(this);
head.next = tail;
tail.prev = head;
}
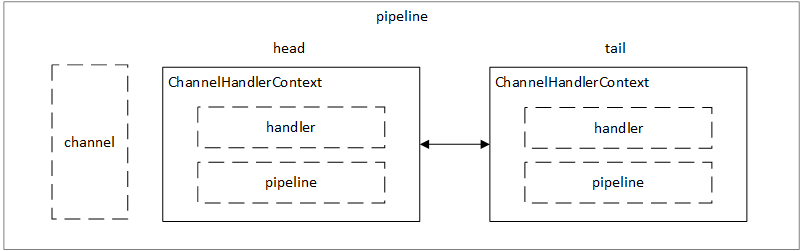
pipeline 中的每个节点是一个 ChannelHandlerContext 对象,一个 ChannelHandlerContext 对象包含一个事件处理器和事件所处上下文环境,其实就是所在 pipeline 的引用,因为通过 pipeline 可以拿到对应的 channel,从而拿到所有上下文信息:
添加 handler
创建了 pipeline 之后就是添加处理器,我们在用户代码中使用 addLast() 方法添加处理器:
1 | b.group(bossGroup, workerGroup) |
添加之后的整体结构如下:

我用两种颜色区分了一下 pipeline 中两种不同类型的节点,一个是 ChannelInboundHandler,处理 inBound 事件,最典型的就是读取数据流,加工处理;还有一种类型的 handler 是 ChannelOutboundHandler,处理 outBound 事件,比如当调用 writeAndFlush() 类方法时,就会经过该种类型的 handler。不管是哪种类型的 handler,其外层对象 ChannelHandlerContext 都是通过 addLast() 方法添加到同一个双向链表中。我们来看一下核心代码:1
2
3
4
5
6
7
8
9
10
11
12
13
14
15
16
17DefaultChannelPipeline
public final ChannelPipeline addFirst(EventExecutorGroup group, String name, ChannelHandler handler) {
final AbstractChannelHandlerContext newCtx;
synchronized (this) {
// 1、检查可重复性
checkMultiplicity(handler);
// 2、创建 context 节点
newCtx = newContext(group, filterName(name, handler), handler);
// 3、添加至链表
addFirst0(newCtx);
//...
}
// 4、回调用户方法
callHandlerAdded0(newCtx);
return this;
}
我们看到 addFirst() 的核心代码是由 synchronized 包裹的,这是为了防止多线程并发插入。然后添加节点的操作被分成了四个部分:检查可重复性->创建 context 节点->添加至链表->回调用户方法。我们依次来看一下。
首先是检查可重复性:1
2
3
4
5
6
7
8
9
10
11
12
13
14DefaultChannelPipeline
private static void checkMultiplicity(ChannelHandler handler) {
if (handler instanceof ChannelHandlerAdapter) {
ChannelHandlerAdapter h = (ChannelHandlerAdapter) handler;
// 如果将要添加的 handler 不可被共享且已在其它 pipeline 上添加过,则抛出异常
if (!h.isSharable() && h.added) {
throw new ChannelPipelineException(
h.getClass().getName() +
" is not a @Sharable handler, so can't be added or removed multiple times.");
}
// 将 added 置为 true,表示已被添加过
h.added = true;
}
}
所谓可重复性是指一个 handler 是否可被添加到多个 Channel 的 pipeline 上。为什么需要有这一步操作呢?因为 Netty 是一个多线程的框架,多个 Channel 可以被同时并发地访问,而如果我们把一个非线程安全的 handler 同时添加在不同的 pipeline 上,就会带来安全性的问题。所以在使用中,如果我们需要在多条 pipeline 添加同一个 handler,那么我们就要在定义 handler 的时候用 @Sharable 这个注解来标明这个 handler 是线程安全的:1
2
3
4.Sharable
public class ServerHandler extends ChannelInboundHandlerAdapter {
//...
}
检查时,Netty 会根据 handler 上是否有 @Sharable 注解来判断这个 handler 是否可以被多次添加:1
2
3
4
5
6
7
8
9
10
11
12
13ChannelHandlerAdapter
public boolean isSharable() {
Class<?> clazz = getClass();
// 通过 ThreadLocal 缓存是否可共享
Map<Class<?>, Boolean> cache = InternalThreadLocalMap.get().handlerSharableCache();
Boolean sharable = cache.get(clazz);
if (sharable == null) {
// 获取注解
sharable = clazz.isAnnotationPresent(Sharable.class);
cache.put(clazz, sharable);
}
return sharable;
}
可以看到 isSharable() 方法正是通过该 handler 对应的类是否标注 @Sharable 来判断 handler 是否可共享。为了性能,Netty 还使用了 ThreadLocal 来缓存状态信息,可谓是把优化做到了极致。
回到主流程,在检查可重复性之后就是创建 context 节点,这里我们先看到 filterName(name, handler) 方法,这个方法用于给 handler 生成一个唯一的名字:1
2
3
4
5
6
7
8
9
10DefaultChannelPipeline
private String filterName(String name, ChannelHandler handler) {
// 没有指定的名称就生成一个,默认是 null
if (name == null) {
return generateName(handler);
}
// 有指定的名称会检查是否重复,如果重复会抛出异常
checkDuplicateName(name);
return name;
}
如果我们指定了 handler 的名称,Netty 会对指定的名称做重复性检查,如果重复就会抛出异常。而默认情况下我们没有指定名称,所以传入的是 null,此时 Netty 会生成一个名字,Netty 创建默认名字的规则为 简单类名#0,下面我们来看些具体是怎么实现的:1
2
3
4
5
6
7
8
9
10
11
12
13
14
15
16
17
18
19
20
21
22
23
24
25DefaultChannelPipeline
private static final FastThreadLocal<Map<Class<?>, String>> nameCaches;
private String generateName(ChannelHandler handler) {
// 先查看缓存中是否有生成过默认 name
Map<Class<?>, String> cache = nameCaches.get();
Class<?> handlerType = handler.getClass();
String name = cache.get(handlerType);
// 没有生成过,就生成一个默认 name,加入缓存
if (name == null) {
name = generateName0(handlerType);
cache.put(handlerType, name);
}
// 生成完了,还要看默认 name 有没有冲突
if (context0(name) != null) {
String baseName = name.substring(0, name.length() - 1); // Strip the trailing '0'.
for (int i = 1;; i ++) {
String newName = baseName + i;
if (context0(newName) == null) {
name = newName;
break;
}
}
}
return name;
}
Netty 使用一个 FastThreadLocal(后面的文章会细说)变量来缓存 handler 的类和默认名称的映射关系,在生成 name 的时候,首先查看缓存中有没有生成过默认 name,如果没有生成,就调用 generateName0() 方法生成默认 name,然后加入缓存。
接下来还需要检查 name 是否和 pipeline 上已有的 name 有冲突,调用 context0() 方法,查找 pipeline 里面有没有对应的 name:1
2
3
4
5
6
7
8
9
10
11private AbstractChannelHandlerContext context0(String name) {
AbstractChannelHandlerContext context = head.next;
// 通过 next 线性搜索,比较名称是否相等
while (context != tail) {
if (context.name().equals(name)) {
return context;
}
context = context.next;
}
return null;
}
context0() 方法遍历链表上每一个 ChannelHandlerContext,只要发现某个 context 的名字与待添加的 name 相同,就返回该 context。可以看到,这个其实是一个线性搜索的过程。
如果 context0(name) != null 成立,说明 pipeline 上已经有了一个和名称相同的 context,那么就从 简单类名#0 往上一直找,直到找到一个唯一的 name,比如 简单类名#3。
如果用户代码在添加 handler 的时候指定了一个 name,那么 Netty 就不再会为 handler 生成名称,如果用户指定的 name 和已有 handler 的名称重复,Netty 会直接抛出异常:
1 | DefaultChannelPipeline |
处理完 name 之后,就进入到创建 context 的过程:
1 | DefaultChannelHandlerContext |
我们看到在 DefaultChannelHandlerContext 和它的父类 AbstractChannelHandlerContext 中会把 handler、pipeline、name 等部件保存起来。这里有个属性叫 executionMask,可以翻译为执行掩码,这个执行掩码实际上按位存放了所有这个 handler 感兴趣事件。Netty 中有很多事件,比如 channelRegistered、channelActive、read、write、flush 等等,每个事件对应掩码中的某一位。当有事件需要传播时,可以通过和掩码做与操作来判断当前 handler 是否对这个事件感兴趣。那么掩码是如何生成的呢?我们进入 mask() 方法看一下:1
2
3
4
5
6
7
8
9
10
11
12
13
14
15
16
17
18
19
20
21
22
23
24
25
26
27
28
29
30
31
32
33
34
35
36
37
38
39
40
41
42
43
44
45
46
47
48
49
50
51
52
53
54
55
56
57
58
59
60
61
62
63
64
65
66
67
68
69
70
71
72
73
74
75
76
77
78
79ChannelHandlerMask
private static int mask0(Class<? extends ChannelHandler> handlerType) {
// 初始掩码为1,表示只关心 exceptionCaught 事件
int mask = MASK_EXCEPTION_CAUGHT;
try {
// 判断当前类型是否是 ChannelInboundHandler 或者它的子类
if (ChannelInboundHandler.class.isAssignableFrom(handlerType)) {
// 如果是 ChannelInboundHandler 或者它的子类,就把所有 inbound 事件置为1
mask |= MASK_ALL_INBOUND;
// 下面的代码用排除的方式,把 handler 不感兴趣的 inbound 事件置为0(11-34)
if (isSkippable(handlerType, "channelRegistered", ChannelHandlerContext.class)) {
mask &= ~MASK_CHANNEL_REGISTERED;
}
if (isSkippable(handlerType, "channelUnregistered", ChannelHandlerContext.class)) {
mask &= ~MASK_CHANNEL_UNREGISTERED;
}
if (isSkippable(handlerType, "channelActive", ChannelHandlerContext.class)) {
mask &= ~MASK_CHANNEL_ACTIVE;
}
if (isSkippable(handlerType, "channelInactive", ChannelHandlerContext.class)) {
mask &= ~MASK_CHANNEL_INACTIVE;
}
if (isSkippable(handlerType, "channelRead", ChannelHandlerContext.class, Object.class)) {
mask &= ~MASK_CHANNEL_READ;
}
if (isSkippable(handlerType, "channelReadComplete", ChannelHandlerContext.class)) {
mask &= ~MASK_CHANNEL_READ_COMPLETE;
}
if (isSkippable(handlerType, "channelWritabilityChanged", ChannelHandlerContext.class)) {
mask &= ~MASK_CHANNEL_WRITABILITY_CHANGED;
}
if (isSkippable(handlerType, "userEventTriggered", ChannelHandlerContext.class, Object.class)) {
mask &= ~MASK_USER_EVENT_TRIGGERED;
}
}
// 判断当前类型是否是 ChannelOutboundHandler 或者它的子类
if (ChannelOutboundHandler.class.isAssignableFrom(handlerType)) {
// 如果是 ChannelOutboundHandler 或者它的子类,就把所有 outbound 事件置为1
mask |= MASK_ALL_OUTBOUND;
// 下面的代码用排除的方式,把 handler 不感兴趣的 outbound 事件置为0(41-67)
if (isSkippable(handlerType, "bind", ChannelHandlerContext.class,
SocketAddress.class, ChannelPromise.class)) {
mask &= ~MASK_BIND;
}
if (isSkippable(handlerType, "connect", ChannelHandlerContext.class, SocketAddress.class,
SocketAddress.class, ChannelPromise.class)) {
mask &= ~MASK_CONNECT;
}
if (isSkippable(handlerType, "disconnect", ChannelHandlerContext.class, ChannelPromise.class)) {
mask &= ~MASK_DISCONNECT;
}
if (isSkippable(handlerType, "close", ChannelHandlerContext.class, ChannelPromise.class)) {
mask &= ~MASK_CLOSE;
}
if (isSkippable(handlerType, "deregister", ChannelHandlerContext.class, ChannelPromise.class)) {
mask &= ~MASK_DEREGISTER;
}
if (isSkippable(handlerType, "read", ChannelHandlerContext.class)) {
mask &= ~MASK_READ;
}
if (isSkippable(handlerType, "write", ChannelHandlerContext.class,
Object.class, ChannelPromise.class)) {
mask &= ~MASK_WRITE;
}
if (isSkippable(handlerType, "flush", ChannelHandlerContext.class)) {
mask &= ~MASK_FLUSH;
}
}
// 最后判断是否关心 exceptionCaught 事件
if (isSkippable(handlerType, "exceptionCaught", ChannelHandlerContext.class, Throwable.class)) {
mask &= ~MASK_EXCEPTION_CAUGHT;
}
} catch (Exception e) {
// Should never reach here.
PlatformDependent.throwException(e);
}
return mask;
}
mask() 方法体非常长,但代码结构十分清晰。Netty 会首先判断当前的 handler 的类型是否是 ChannelInboundHandler 或者它的子类,如果是的话,就把所有 inbound 相关事件置为 1,然后用排除法把 handler 不感兴趣的 inbound 事件置为 0;同理,处理 outbound 事件时也会先判断它是否是 ChannelOutboundHandler 或者它的子类,如果是的话,就把所有 outbound 相关事件置为 1,然后用排除法把 handler 不感兴趣的 outbound 事件置为 0。那么 Netty 是如何判断当前 handler 对某一个事件不感兴趣的呢?我们看到它使用了 isSkippable() 方法:1
2
3
4
5
6
7
8
9
10ChannelHandlerMask
private static boolean isSkippable(final Class<?> handlerType, final String methodName, final Class<?>... paramTypes) throws Exception {
return AccessController.doPrivileged(new PrivilegedExceptionAction<Boolean>() {
public Boolean run() throws Exception {
// 判断方法上是否有 @Skip 注解
return handlerType.getMethod(methodName, paramTypes).isAnnotationPresent(Skip.class);
}
});
}
方法内部通过判断 handler 的对应方法上是否有 @Skip 注解来判断它是否对一个事件不感兴趣。这里我们可能会有一个疑问:通常我们的 handler 只会关注一到两个事件,也就是大部分事件我们都是不关心的,那么我们在定义 handler 的时候,难道要在所有方法上都加个 @Skip 注解?其实是不用的,因为 Netty 已经在 Adapter 里面帮我们写好了:1
2
3
4
5
6
7
8
9
10
11
12
13
14
15public class ChannelInboundHandlerAdapter extends ChannelHandlerAdapter implements ChannelInboundHandler {
// 所有的方法上都有 @Skip 注解
public void channelRegistered(ChannelHandlerContext ctx) throws Exception {
ctx.fireChannelRegistered();
}
public void channelUnregistered(ChannelHandlerContext ctx) throws Exception {
ctx.fireChannelUnregistered();
}
//...
}
也就是说,对于用户来说,只要继承了 Adapter,那么所有用户没有重写的方法都是 @Skip 的,只有用户重写了的方法才是没有 @Skip 的。也就是说,只有这些由用户重写了的方法是 handler 关心的,其它由 Adapter 提供默认实现的方法是 handler 不关心的。
回到主流程,context 创建完之后,接下来就是添加节点至链表,这个过程非常简单,就是常见的链表添加操作,相信大家都能看懂:1
2
3
4
5
6
7
8DefaultChannelHandlerContext
private void addLast0(AbstractChannelHandlerContext newCtx) {
AbstractChannelHandlerContext prev = tail.prev;
newCtx.prev = prev;
newCtx.next = tail;
prev.next = newCtx;
tail.prev = newCtx;
}
这里要提一点就是 addLast() 和 addFirst() 中的 last 和 first 是相对除了 head 和 tail 节点的链表而言的,head 和 tail 永远都是链表的首部和尾部。
回到主流程,节点添加的最后一步就是回调用户代码,核心代码如下:1
2
3
4
5
6
7
8AbstractChannelHandlerContext
final void callHandlerAdded() throws Exception {
// 设置 handler 状态
if (setAddComplete()) {
// 回调用户代码
handler().handlerAdded(this);
}
}
setAddComplete() 会通过 cas 设置 handler 状态:1
2
3
4
5
6
7
8
9AbstractChannelHandlerContext
final void setAddComplete() {
for (;;) {
int oldState = handlerState;
if (oldState == REMOVE_COMPLETE || HANDLER_STATE_UPDATER.compareAndSet(this, oldState, ADD_COMPLETE)) {
return;
}
}
}
然后调用用户的回调方法,常见的定义如下:1
2
3
4
5
6
7public class DemoHandler extends SimpleChannelInboundHandler<...> {
public void handlerAdded(ChannelHandlerContext ctx) throws Exception {
// 节点被添加完毕之后回调到此
// do something
}
}
到此,handler 的添加过程就结束了。
删除 handler
Netty 有个最大的特性之一就是 handler 可插拔,做到动态编织 pipeline,比如在首次建立连接的时候,需要通过进行权限认证,在认证通过之后,就可以将此 context 移除,下次 pipeline 在传播事件的时候就不会调用到权限认证处理器。
下面是权限认证 handler 最简单的实现,第一个数据包传来的是认证信息,如果校验通过,就删除此 handler,否则,直接关闭连接:1
2
3
4
5
6
7
8
9
10
11
12
13
14public class AuthHandler extends SimpleChannelInboundHandler<ByteBuf> {
protected void channelRead0(ChannelHandlerContext ctx, ByteBuf data) throws Exception {
if (verify(authDataPacket)) {
ctx.pipeline().remove(this);
} else {
ctx.close();
}
}
private boolean verify(ByteBuf byteBuf) {
//...
}
}
重点就在 ctx.pipeline().remove(this) 这段代码,这段代码把 AuthHandler 从当前 pipeline 移除,我们看看是怎么实现的:1
2
3
4
5
6
7
8
9
10
11
12
13
14
15
16
17DefaultChannelPipeline
public final ChannelPipeline remove(ChannelHandler handler) {
// 1、找到待删除节点
remove(getContextOrDie(handler));
return this;
}
DefaultChannelPipeline
private AbstractChannelHandlerContext remove(final AbstractChannelHandlerContext ctx) {
synchronized (this) {
// 2、从链表上删除
remove0(ctx);
//..
}
// 3、回调用户方法
callHandlerRemoved0(ctx);
return ctx;
}
首先是找到待删除的节点,过程很简单:1
2
3
4
5
6
7
8
9
10
11
12
13
14
15
16
17
18
19
20
21
22
23
24
25
26
27
28
29DefaultChannelPipeline
private AbstractChannelHandlerContext getContextOrDie(ChannelHandler handler) {
// 顺序搜索对应节点
AbstractChannelHandlerContext ctx = (AbstractChannelHandlerContext) context(handler);
// 没找到就抛出异常
if (ctx == null) {
throw new NoSuchElementException(handler.getClass().getName());
} else {
return ctx;
}
}
DefaultChannelPipeline
public final ChannelHandlerContext context(ChannelHandler handler) {
AbstractChannelHandlerContext ctx = head.next;
// 从头节点开始不断 next 搜索,对比 handler 是否相同
for (;;) {
if (ctx == null) {
return null;
}
// 如果 handler 相同,返回当前的 context 节点
if (ctx.handler() == handler) {
return ctx;
}
ctx = ctx.next;
}
}
这里为了找到 handler 对应的 context,照样是通过依次遍历双向链表的方式,直到某一个 context 的 handler 和当前 handler 相同,便找到了该节点。
找到节点之后就是把节点从链表中删除,和添加一样,都是常规的链表操作:1
2
3
4
5
6
7DefaultChannelPipeline
private static void remove0(AbstractChannelHandlerContext ctx) {
AbstractChannelHandlerContext prev = ctx.prev;
AbstractChannelHandlerContext next = ctx.next;
prev.next = next;
next.prev = prev;
}
最后是回调用户代码,在回调后会修改 handler 当前状态:1
2
3
4
5
6
7
8
9
10
11
12
13AbstractChannelHandlerContext
final void callHandlerRemoved() throws Exception {
try {
// 判断当前 handler 状态
if (handlerState == ADD_COMPLETE) {
// 回调用户方法
handler().handlerRemoved(this);
}
} finally {
// 修改 handler 状态
handlerState = REMOVE_COMPLETE;
}
}
到此,删除节点的操作就做完了。相比添加而言删除节点比较简单。
inbound 和 outbound
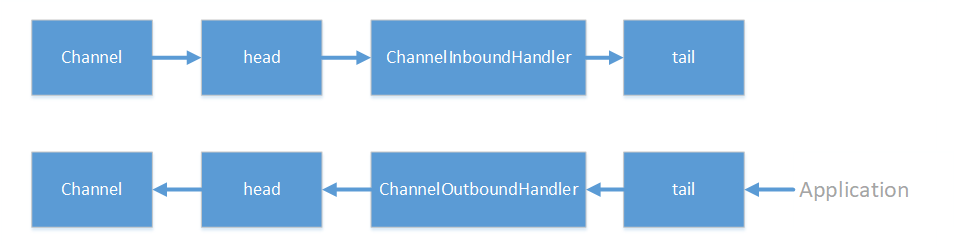
Netty 中的处理器分两类:一类是入站处理器(ChannelInboundHandler),专门用于处理入站(inbound)事件;另一类是出站处理器(ChannelOutboundHandler),专门用于处理出站(outbound)事件。inbound 事件和 outbound 事件都会沿着 pipeline 传播,但两者传播的方向不一样:inbound 事件是从头节点到尾节点,而 outbound 事件是从尾节点传到头节点。两者传播的示意图如下:
从大方向上而言,inbound 事件主要是发生在数据被接收或者 Channel 状态发生改变时;而 outbound 事件发生在数据发送或者用户对 Channel 进行操作时。从用户的角度而言,inbound 事件是被动接收的,而 outbound 事件是主动发起的。具体事件列表如下:
inbound 事件:
| 事件 | 描述 |
|---|---|
| channelRegistered | 当 Channel 已经注册到它的 EventLoop 时被调用 |
| channelUnregistered | 当 Channel 已经从它的 EventLoop 注销时被调用 |
| channelActive | 当 Channel 已经连接到远程节点/已经绑定到端口(可以接受和发送数据)时被调用 |
| channelInactive | 当 Channel 已经和远程节点断开/已经和端口解绑时被调用 |
| channelRead | 从 Channel 读取数据时被调用 |
| channelReadComplete | 当所有可读字节都已经从 Channel 中读取后被调用 |
| channelWritabilityChanged | 当 Channel 的可写状态发生改变时被调用 |
| userEventTriggered | 用户可以通过 fireUserEventTriggered() 方法主动触发 |
outbound 事件:
| 事件 | 描述 |
|---|---|
| bind | 当请求将 Channel 绑定到端口时被调用 |
| connect | 当请求将 Channel 连接到远程节点时被调用 |
| disconnect | 当请求将 Channel 从远程节点断开时被调用 |
| close | 当请求关闭 Channel 时被调用 |
| deregister | 当请求将 Channel 从它的 EventLoop 注销时被调用 |
| read | 当请求从 Channel 读取更多数据时被调用 |
| flush | 当请求通过 Channel 将入队数据冲刷到远程节点时被调用 |
| write | 当请求通过 Channel 将数据写到远程节点时被调用 |
其中,读写数据是我们最常见的场景,也是最具代表性的 inbound 和 outbound 事件。接下来我们将分别从读写两种场景观察 pipeline 事件传播的机制。
inbound 事件传播
首先是读事件的传播,我们先从客户端发送数据,然后观察服务端是如何读取这些数据的。客户端代码如下:1
2
3
4
5
6
7
8
9
10
11
12
13
14
15
16
17
18
19
20
21
22
23
24
25
26
27public class Client {
public static void main(String[] args) throws Exception {
EventLoopGroup workerGroup = new NioEventLoopGroup();
try {
Bootstrap b = new Bootstrap();
b.group(workerGroup)
.channel(NioSocketChannel.class)
.handler(new ChannelInitializer<SocketChannel>() {
protected void initChannel(SocketChannel ch) throws Exception {
}
});
// 连接到服务器
ChannelFuture f = b.connect("127.0.0.1",8888).sync();
// 获取 buffer
ByteBuf buf = PooledByteBufAllocator.DEFAULT.buffer();
// 把消息写入 buffer
buf.writeBytes("hello".getBytes());
// 把 buffer 中的数据写到 channel 并刷新
f.channel().writeAndFlush(buf).sync();
} finally {
workerGroup.shutdownGracefully();
}
}
}
上面代码是一个简单的客户端代码,会在连接到服务器后发送字符串“hello”到服务端。然后是服务端代码:1
2
3
4
5
6
7
8
9
10
11
12
13
14
15
16
17
18
19
20
21
22
23
24
25
26
27
28
29
30
31
32
33
34
35
36
37
38
39
40
41
42
43
44
45
46
47
48
49
50
51
52
53
54
55
56
57
58
59
60
61
62
63
64
65public final class Server {
public static void main(String[] args) throws Exception {
EventLoopGroup bossGroup = new NioEventLoopGroup(1);
EventLoopGroup workerGroup = new NioEventLoopGroup();
try {
ServerBootstrap b = new ServerBootstrap();
b.group(bossGroup, workerGroup)
.channel(NioServerSocketChannel.class)
.option(ChannelOption.SO_BACKLOG, 1024)
.childOption(ChannelOption.TCP_NODELAY, true)
.childHandler(new ChannelInitializer<SocketChannel>() {
public void initChannel(SocketChannel ch) {
ch.pipeline().addLast(new ChannelInboundHandlerAdapter() {
public void channelRead(ChannelHandlerContext ctx, Object msg) throws Exception {
// 接收到 buffer
ByteBuf buf = (ByteBuf)msg;
// 打印标签 A
System.out.print("InboundHandlerA:");
// 以字符串形式打印 buffer 中内容
System.out.println(buf.toString(Charset.defaultCharset()));
// 继续传播读事件
ctx.fireChannelRead(msg);
}
});
ch.pipeline().addLast(new ChannelInboundHandlerAdapter() {
public void channelRead(ChannelHandlerContext ctx, Object msg) throws Exception {
// 接收到 buffer
ByteBuf buf = (ByteBuf)msg;
// 打印标签 B
System.out.print("InboundHandlerB:");
// 以字符串形式打印 buffer 中内容
System.out.println(buf.toString(Charset.defaultCharset()));
// 继续传播读事件
ctx.fireChannelRead(msg);
}
});
ch.pipeline().addLast(new ChannelInboundHandlerAdapter() {
public void channelRead(ChannelHandlerContext ctx, Object msg) throws Exception {
// 接收到 buffer
ByteBuf buf = (ByteBuf)msg;
// 打印标签 C
System.out.print("InboundHandlerC:");
// 以字符串形式打印 buffer 中内容
System.out.println(buf.toString(Charset.defaultCharset()));
// 继续传播读事件
ctx.fireChannelRead(msg);
}
});
}
});
// 启动服务器,监听 8888 端口
ChannelFuture f = b.bind(8888).sync();
f.channel().closeFuture().sync();
} finally {
bossGroup.shutdownGracefully();
workerGroup.shutdownGracefully();
}
}
}
上面是一段服务器代码,可以看到在服务端的 pipeline 上依次添加了 A、B、C 三个 inbound 处理器,每个处理器在接收到读事件后会打印自己的标签和缓冲区的内容。服务端的 pipeline 顺序如下图所示:

最终程序运行结果为:
1 | InboundHandlerA:hello |
可以看到,读事件在 pipeline 中是从 head 传播到 tail 的,并且每个 handler 都接收到了 Channel 中的数据。那么这一切是怎么发生的呢?我们来看一下源码。
根据前几章的知识,我们知道了 Channel 是注册在 NioEventLoop 上的,而 NioEventLoop 在不停地轮询读写事件,所以当客户端的数据达到时,第一时间是由 NioEventLoop 处理的,这也是我们阅读源码的起点:
1 | // NioEventLoop |
上面这段代码在新连接接入一章提到过,当检测到读事件之后,Netty 会调用 Channel 上绑定的 unsafe 的 read() 方法:1
2
3
4
5
6
7
8
9
10
11
12
13
14
15
16
17
18
19
20
21
22
23
24
25
26
27
28NioByteUnsafe
public final void read() {
final ChannelPipeline pipeline = pipeline();
final ByteBufAllocator allocator = config.getAllocator();
final RecvByteBufAllocator.Handle allocHandle = recvBufAllocHandle();
allocHandle.reset(config);
ByteBuf byteBuf = null;
try {
do {
// 为 byteBuf 分配内存
byteBuf = allocHandle.allocate(allocator);
// 将 Channel 中的数据读到 byteBuf
allocHandle.lastBytesRead(doReadBytes(byteBuf));
allocHandle.incMessagesRead(1);
readPending = false;
// 传播 ChannelRead 事件
pipeline.fireChannelRead(byteBuf);
byteBuf = null;
} while (allocHandle.continueReading());
allocHandle.readComplete();
// 传播 readComplete 事件
pipeline.fireChannelReadComplete();
} catch (Throwable t) {
//...
} finally {
//...
}
}
Netty 会首先为有数据的 Channel 创建 byteBuf,然后把 Channel 中的数据读到 byteBuf 中。我们的重点是 pipeline.fireChannelRead(byteBuf); 这一行,这行代码中 Netty 会传播一个读事件,我们看一下实际的流程:1
2
3
4
5
6DefaultChannelPipeline
public final ChannelPipeline fireChannelRead(Object msg) {
// 调用静态方法 invokeChannelRead,传入 head 节点和 msg
AbstractChannelHandlerContext.invokeChannelRead(head, msg);
return this;
}
首先是调用一个静态方法 invokeChannelRead(),传入的是 head 节点和 msg:1
2
3
4
5
6
7
8
9
10
11
12
13
14
15
16
17
18AbstractChannelHandlerContext
static void invokeChannelRead(final AbstractChannelHandlerContext next, Object msg) {
final Object m = next.pipeline.touch(ObjectUtil.checkNotNull(msg, "msg"), next);
EventExecutor executor = next.executor();
// 如果当前线程是 Channel 所在线程,直接执行
if (executor.inEventLoop()) {
// 调用当前节点的 invokeChannelRead 方法
next.invokeChannelRead(m);
} else {
// 如果当前线程不是 Channel 所在线程,把执行逻辑提交给异步任务队列
executor.execute(new Runnable() {
public void run() {
next.invokeChannelRead(m);
}
});
}
}
这里 Netty 为了确保线程的安全性,会确保操作在 Channel 所在 NioEventLoop 的线程中执行。然后调用当前节点的 invokeChannelRead() 方法,当前的节点是 head,所以调用 head 节点的 invokeChannelRead() 方法:1
2
3
4
5
6
7
8
9
10
11
12
13
14AbstractChannelHandlerContext
private void invokeChannelRead(Object msg) {
// 判断节点状态
if (invokeHandler()) {
try {
// 获取节点的 handler,调用 handler 的 channelRead 方法
((ChannelInboundHandler) handler()).channelRead(this, msg);
} catch (Throwable t) {
//...
}
} else {
fireChannelRead(msg);
}
}
首先会判断当前节点的状态,然后拿到当前节点内部的 handler,调用该 handler 的 channelRead() 方法,这里拿到的是 HeadContext 本身:1
2
3
4
5HeadContext
public void channelRead(ChannelHandlerContext ctx, Object msg) {
// 传播读事件
ctx.fireChannelRead(msg);
}
可以看到 HeadContext 在收到读事件后没有进行任何操作,而是通过 fireChannelRead() 方法直接把事件往下传播:1
2
3
4
5
6AbstractChannelHandlerContext
public ChannelHandlerContext fireChannelRead(final Object msg) {
// 找到下一个节点,继续传播
invokeChannelRead(findContextInbound(MASK_CHANNEL_READ), msg);
return this;
}
和刚开始一样,这里依然是调用静态方法 invokeChannelRead(),但是传入的参数变化了,传入的不是 head,而是通过 findContextInbound(MASK_CHANNEL_READ) 方法找到的下一个节点。
我们把视角放到 findContextInbound(MASK_CHANNEL_READ) 这个方法上来。这里传入的 MASK_CHANNEL_READ 其实就是 channelRead 事件的掩码,所以从语义上,这是要找到下一个关注 channelRead 事件的节点,我们来看一下内部是怎么实现的:1
2
3
4
5
6
7
8AbstractChannelHandlerContext
private AbstractChannelHandlerContext findContextInbound(int mask) {
AbstractChannelHandlerContext ctx = this;
do {
ctx = ctx.next;
} while ((ctx.executionMask & mask) == 0);
return ctx;
}
可以看到 Netty 会从当前节点开始不断往下找,直到找到第一个执行掩码和 channelRead 事件的掩码相与不为 0 的节点,返回。
当我们重写 channelRead() 方法之后,节点在 channelRead 所在位上的掩码就被置为了 1,因此我们自定义的三个处理器 A、B、C 的执行掩码和 channelRead 事件的掩码相与的结果都不为0,三个处理器会被依次调用,执行它们的 channelRead() 方法。
那么 inbound 事件的传播在什么地方结束呢?如果我们自定义的 handler 没有进行 fireChannelRead() 操作的话,那么传播就会在那个 handler 结束。而如果我们的 handler 都有 fireChannelRead() 这步操作的话,传播会在 tail 节点结束:1
2
3
4TailContext
public void channelRead(ChannelHandlerContext ctx, Object msg) {
onUnhandledInboundMessage(msg);
}
上面是 tail 节点的 channelRead() 方法,可以看到 tail 节点没有继续进行 fireChannelRead() 操作,而是通过一个 onUnhandledInboundMessage() 方法拦住了事件的传播。这个方法的内部如下:1
2
3
4
5
6
7
8
9
10
11DefaultChannelPipeline
protected void onUnhandledInboundMessage(Object msg) {
try {
// 打印提示
logger.debug("Discarded inbound message {} that reached at the tail of the pipeline. " +
"Please check your pipeline configuration.", msg);
} finally {
// 释放 bytebuf
ReferenceCountUtil.release(msg);
}
}
方法会打印一个提示,提示用户没有对 channelRead 事件进行拦截,然后会释放 bytebuf,相当于做了一个兜底操作。
那么到这里,一次读事件的传播就结束了。
outbound 事件传播
outbound 事件中典型的就是写事件。我们来看一下写事件是如何在 pipeline 上传播的。
首先是搭建一个实验场景:1
2
3
4
5
6
7
8
9
10
11
12
13
14
15
16
17
18
19
20
21
22
23
24
25
26
27
28
29
30
31
32
33
34
35
36
37
38
39
40
41
42
43
44
45
46
47
48
49
50
51
52
53
54
55
56
57
58
59
60
61
62public class Client {
public static void main(String[] args) throws Exception {
EventLoopGroup workerGroup = new NioEventLoopGroup();
try {
Bootstrap b = new Bootstrap();
b.group(workerGroup)
.channel(NioSocketChannel.class)
.handler(new ChannelInitializer<SocketChannel>() {
protected void initChannel(SocketChannel ch) throws Exception {
ch.pipeline().addLast(new ChannelOutboundHandlerAdapter(){
public void write(ChannelHandlerContext ctx, Object msg, ChannelPromise promise) throws Exception {
// 打印标签 A
System.out.print("ChannelOutboundHandlerA:");
// 打印写入的数据
System.out.println(((ByteBuf)msg).toString(Charset.defaultCharset()));
// 继续传播写事件
ctx.write(msg);
}
});
ch.pipeline().addLast(new ChannelOutboundHandlerAdapter(){
public void write(ChannelHandlerContext ctx, Object msg, ChannelPromise promise) throws Exception {
// 打印标签 B
System.out.print("ChannelOutboundHandlerB:");
// 打印写入的数据
System.out.println(((ByteBuf)msg).toString(Charset.defaultCharset()));
// 继续传播写事件
ctx.write(msg);
}
});
ch.pipeline().addLast(new ChannelOutboundHandlerAdapter(){
public void write(ChannelHandlerContext ctx, Object msg, ChannelPromise promise) throws Exception {
// 打印标签 C
System.out.print("ChannelOutboundHandlerC:");
// 打印写入的数据
System.out.println(((ByteBuf)msg).toString(Charset.defaultCharset()));
// 继续传播写事件
ctx.write(msg);
}
});
ch.pipeline().addLast(new ChannelInboundHandlerAdapter(){
public void channelActive(ChannelHandlerContext ctx) throws Exception {
// 在连接建立时写入一个 "hello" 到 Channel
ByteBuf buf = PooledByteBufAllocator.DEFAULT.buffer();
buf.writeBytes("hello".getBytes());
ctx.pipeline().write(buf);
}
});
}
});
// 连接到服务器
ChannelFuture f = b.connect("127.0.0.1",8888).sync();
} finally {
workerGroup.shutdownGracefully();
}
}
}
这次实验的服务端代码和上一小节中的一样,重点是客户端代码。我们在客户端代码中加入了 A、B、C 三个 outbound 事件处理器,每个处理器都会监听 pipeline 上的 write 事件并打印写入的数据。另有一个处理器用于在连接建立时向 Channel 写入数据。三个 outbound 事件处理器在 pipeline 上的顺序如下:
最终程序运行结果如下:
1 | ChannelOutboundHandlerC:hello |
可以看到写事件传播的方向和读事件相反,是从尾结点向头节点传播的。下面我们从源码的角度来看一下事件传播的过程。
首先是写事件的起点,ctx.pipeline().write(buf) 这行代码:1
2
3
4
5DefaultChannelPipeline
public final ChannelFuture write(Object msg) {
// 调用 tail 节点的 write 方法
return tail.write(msg);
}
进入之后会发现,pipeline 会调用 tail 节点的 write() 方法:1
2
3
4
5
6
7
8
9
10
11
12
13
14
15
16
17
18
19
20
21
22
23
24
25
26
27
28
29
30
31
32
33
34
35
36
37AbstractChannelHandlerContext
public ChannelFuture write(Object msg) {
// 调用重载方法,传入一个 promise
return write(msg, newPromise());
}
AbstractChannelHandlerContext
public ChannelFuture write(final Object msg, final ChannelPromise promise) {
// 调用重载方法,第二个参数是 flush,传入为 false
write(msg, false, promise);
return promise;
}
AbstractChannelHandlerContext
private void write(Object msg, boolean flush, ChannelPromise promise) {
// write 方法的核心代码,这里的 flush 为 false
// 查找下一个节点
final AbstractChannelHandlerContext next = findContextOutbound(flush ? (MASK_WRITE | MASK_FLUSH) : MASK_WRITE);
final Object m = pipeline.touch(msg, next);
EventExecutor executor = next.executor();
// 确保 write 操作在 NioEventLoop 的内部线程中
if (executor.inEventLoop()) {
// 根据是否 flush 传播不同的事件
if (flush) {
next.invokeWriteAndFlush(m, promise);
} else {
next.invokeWrite(m, promise);
}
} else {
final AbstractWriteTask task;
if (flush) {
task = WriteAndFlushTask.newInstance(next, m, promise);
} else {
task = WriteTask.newInstance(next, m, promise);
}
}
}
这里 write 方法有三个重载的版本,核心代码在第三个版本中。我们把眼光放到第 18 行的 findContextOutbound() 方法上。传播 inbound 事件时有个类似的方法,会根据传入的事件掩码查找下一个匹配的节点。这里当我们的 flush 为 false 时,查找的是下一个关注 write 事件的节点:1
2
3
4
5
6
7
8AbstractChannelHandlerContext
private AbstractChannelHandlerContext findContextOutbound(int mask) {
AbstractChannelHandlerContext ctx = this;
do {
ctx = ctx.prev;
} while ((ctx.executionMask & mask) == 0);
return ctx;
}
可以看到内部的逻辑和之前的方法很像,只是这里是通过 while 循环不断找到前一个节点。这也是为什么 outbound 事件和 inbound 事件传播方向不一样的原因了。
回到 write 方法,在找到 next 节点后,会判断当前线程是否是 Channel 绑定的 NioEventLoop 的内部线程,这是出于线程安全的考虑。然后会调用 next 节点的 invokeWrite() 方法。当前这里的 next 节点就是我们的 C 处理器。会调用该处理器的 invokeWrite() 方法:1
2
3
4
5
6
7
8
9
10
11
12
13
14
15
16
17
18
19
20AbstractChannelHandlerContext
private void invokeWrite(Object msg, ChannelPromise promise) {
// 判断节点状态
if (invokeHandler()) {
// 实际执行方法
invokeWrite0(msg, promise);
} else {
write(msg, promise);
}
}
AbstractChannelHandlerContext
private void invokeWrite0(Object msg, ChannelPromise promise) {
try {
// 调用 handler 的 write 方法,这里是我们自定义的第三个 handler
((ChannelOutboundHandler) handler()).write(this, msg, promise);
} catch (Throwable t) {
notifyOutboundHandlerException(t, promise);
}
}
首先会判断节点状态,然后调用节点内部的 handler 的 write() 方法,这个方法就是我们在用户代码中自定义的:1
2
3
4
5
6Client
public void write(ChannelHandlerContext ctx, Object msg, ChannelPromise promise) throws Exception {
System.out.print("ChannelOutboundHandlerC:");
System.out.println(((ByteBuf)msg).toString(Charset.defaultCharset()));
ctx.write(msg);
}
最终用户代码会通过 ctx.write(msg) 把写事件传播到下一个节点。
那么如果我们始终不对写事件进行拦截,写事件最终会传播到哪呢?答案是最终会传播到 head 节点:1
2
3
4HeadContext
public void write(ChannelHandlerContext ctx, Object msg, ChannelPromise promise) {
unsafe.write(msg, promise);
}
可以看到在 head 节点中,不会再传播写事件,而是会调用 unsafe 的 write() 方法对事件进行拦截:1
2
3
4
5
6
7public final void write(Object msg, ChannelPromise promise) {
// 拿到 unsafe 的 outboundBuffer
ChannelOutboundBuffer outboundBuffer = this.outboundBuffer;
//...
// 把消息写到 outboundBuffer 中
outboundBuffer.addMessage(msg, size, promise);
}
最终消息会被写到 unsafe 内部的一个 outboundBuffer 中。这是每个 unsafe 内部保存的一个缓冲区,用于缓冲将要写到 Channel 中的数据。当我们调用 flush() 方法时,这里的数据会被刷到 Channel 中。
到此,outbound 事件传播的过程也结束了。
异常的传播
前两节我们看到了 inbound 和 outbound 事件的传播,而这一章来看一下另一个非常重要的部分,异常传播。
Netty 之所以可靠的一个很重要的原因,就是我们可以在每个处理器上去捕获上游节点抛出的异常。捕获的方法为 exceptionCaught,这是每种类型的处理器都需要实现的方法。而如果我们用户代码没有捕获异常,Netty 也会做些兜底的措施,防止异常影响到线程正常运行。我们来看一下 Netty 具体是怎么做的。
和前两节一样,我们先介绍一下实验环境:1
2
3
4
5
6
7
8
9
10
11
12
13
14
15
16
17
18
19
20
21
22
23
24
25
26
27
28
29
30
31
32
33
34
35
36
37
38
39
40
41
42
43
44
45
46
47
48
49
50public class Client {
public static void main(String[] args) throws Exception {
EventLoopGroup workerGroup = new NioEventLoopGroup();
try {
Bootstrap b = new Bootstrap();
b.group(workerGroup)
.channel(NioSocketChannel.class)
.handler(new ChannelInitializer<SocketChannel>() {
protected void initChannel(SocketChannel ch) throws Exception {
ch.pipeline().addLast(new ChannelHandlerAdapter() {
public void exceptionCaught(ChannelHandlerContext ctx, Throwable cause) throws Exception {
// 打印标签
System.out.print("ChannelHandlerA catches:");
// 打印错误信息
System.out.println(cause.getMessage());
// 继续传播异常
ctx.fireExceptionCaught(cause);
}
});
ch.pipeline().addLast(new ChannelInboundHandlerAdapter() {
public void channelActive(ChannelHandlerContext ctx) throws Exception {
System.out.println("ChannelHandlerB throws exception");
// 抛出异常
throw new Exception("Exception from B");
}
});
ch.pipeline().addLast(new ChannelHandlerAdapter() {
public void exceptionCaught(ChannelHandlerContext ctx, Throwable cause) throws Exception {
// 打印标签
System.out.print("ChannelHandlerC catches:");
// 打印错误信息
System.out.println(cause.getMessage());
// 继续传播异常
ctx.fireExceptionCaught(cause);
}
});
}
});
// 连接到服务器
ChannelFuture f = b.connect("127.0.0.1", 8888).sync();
} finally {
workerGroup.shutdownGracefully();
}
}
}
还是在我们的客户端,我们添加了 A、B、C 三个处理器,当客户端连上服务器后,处理器 B 会抛出一个异常,A、C 处理器监听异常事件并在收到异常事件后打印异常的信息。三个处理器在 pipeline 上的关系如下:

程序最终的结果如下:1
2
3
4
5
6
7
8
9
10
11
12
13
14
15
16
17
18
19
20
21
22
23ChannelHandlerB throws exception
ChannelHandlerC catches:Exception from B
十月 07, 2019 6:59:37 下午 io.netty.channel.DefaultChannelPipeline onUnhandledInboundException
警告: An exceptionCaught() event was fired, and it reached at the tail of the pipeline. It usually means the last handler in the pipeline did not handle the exception.
java.lang.Exception: Exception from B
at test.Client$1$2.channelActive(Client.java:40)
at io.netty.channel.AbstractChannelHandlerContext.invokeChannelActive(AbstractChannelHandlerContext.java:225)
at io.netty.channel.AbstractChannelHandlerContext.invokeChannelActive(AbstractChannelHandlerContext.java:211)
at io.netty.channel.AbstractChannelHandlerContext.fireChannelActive(AbstractChannelHandlerContext.java:204)
at io.netty.channel.DefaultChannelPipeline$HeadContext.channelActive(DefaultChannelPipeline.java:1396)
at io.netty.channel.AbstractChannelHandlerContext.invokeChannelActive(AbstractChannelHandlerContext.java:225)
at io.netty.channel.AbstractChannelHandlerContext.invokeChannelActive(AbstractChannelHandlerContext.java:211)
at io.netty.channel.DefaultChannelPipeline.fireChannelActive(DefaultChannelPipeline.java:906)
at io.netty.channel.nio.AbstractNioChannel$AbstractNioUnsafe.fulfillConnectPromise(AbstractNioChannel.java:311)
at io.netty.channel.nio.AbstractNioChannel$AbstractNioUnsafe.finishConnect(AbstractNioChannel.java:341)
at io.netty.channel.nio.NioEventLoop.processSelectedKey(NioEventLoop.java:670)
at io.netty.channel.nio.NioEventLoop.processSelectedKeysOptimized(NioEventLoop.java:617)
at io.netty.channel.nio.NioEventLoop.processSelectedKeys(NioEventLoop.java:534)
at io.netty.channel.nio.NioEventLoop.run(NioEventLoop.java:496)
at io.netty.util.concurrent.SingleThreadEventExecutor$5.run(SingleThreadEventExecutor.java:906)
at io.netty.util.internal.ThreadExecutorMap$2.run(ThreadExecutorMap.java:74)
at io.netty.util.concurrent.FastThreadLocalRunnable.run(FastThreadLocalRunnable.java:30)
at java.lang.Thread.run(Thread.java:748)
可以看到,只有处理器 C 接收到了异常事件(第二行),而处理器 A 没有收到。另外 Netty 打印了一个警告和异常的堆栈信息。
我们从源码中看一下发生了什么:1
2
3
4
5
6
7
8
9
10
11
12
13AbstractChannelHandlerContext
private void invokeChannelActive() {
if (invokeHandler()) {
try {
((ChannelInboundHandler) handler()).channelActive(this);
} catch (Throwable t) {
// catch 住异常
notifyHandlerException(t);
}
} else {
fireChannelActive();
}
}
在传播事件的过程中,如果发生了异常,就会在对应的 invokeXXX() 方法中 catch 住这个异常。catch 的方法体内会调用 notifyHandlerException() 方法:1
2
3
4
5AbstractChannelHandlerContext
private void notifyHandlerException(Throwable cause) {
//...
invokeExceptionCaught(cause);
}
我们看到了一个 invokeExceptionCaught() 方法,从名字可以知道这个方法会执行节点的 exceptionCaught() 方法:1
2
3
4
5
6
7
8
9
10
11
12
13
14
15
16
17
18
19
20
21AbstractChannelHandlerContext
private void invokeExceptionCaught(final Throwable cause) {
// 判断节点状态
if (invokeHandler()) {
try {
// 调用 handler 的 exceptionCaught 方法
handler().exceptionCaught(this, cause);
} catch (Throwable error) {
//...
}
} else {
fireExceptionCaught(cause);
}
}
ChannelHandlerAdapter
public void exceptionCaught(ChannelHandlerContext ctx, Throwable cause)
throws Exception {
// 传播异常事件
ctx.fireExceptionCaught(cause);
}
节点会首先判断自己的状态,然后调用 handler 的 exceptionCaught 方法。这里调用到了 ChannelHandlerAdapter 的默认实现,默认实现中节点会直接把异常事件传播出去:1
2
3
4
5AbstractChannelHandlerContext
public ChannelHandlerContext fireExceptionCaught(final Throwable cause) {
invokeExceptionCaught(findContextInbound(MASK_EXCEPTION_CAUGHT), cause);
return this;
}
这段传播异常事件的方法大家想必都不会陌生。没错,这里会找到下一个对异常事件感兴趣的节点然后把异常传播下去。让我们感到惊讶的是,异常传播中寻找下一个节点的方法是 findContextInbound(),这和 inbound 事件中查找下一个节点的方法是同一个!也就是说,异常传播的方向和 inbound 事件是一样的(不过也好理解,因为异常事件和 inbound 事件都是被动接受的,而 outbound 事件一般是主动触发的)。我们看一下实际的逻辑:
1 | AbstractChannelHandlerContext |
确实和 inbound 是一样的,都是往后寻找下一个能接收事件的节点。
那么如果我们一直传播下去,最终异常会怎么处理呢?和 inbound 事件一样,tail 节点对异常事件做了兜底操作:
1 | public void exceptionCaught(ChannelHandlerContext ctx, Throwable cause) { |
onUnhandledInboundException 方法对异常做了兜底处理:1
2
3
4
5
6
7
8
9
10
11
12protected void onUnhandledInboundException(Throwable cause) {
try {
// 打印异常信息,提醒用户没有 caught 异常
logger.warn(
"An exceptionCaught() event was fired, and it reached at the tail of the pipeline. " +
"It usually means the last handler in the pipeline did not handle the exception.",
cause);
} finally {
// 释放掉异常,让异常不会中断线程
ReferenceCountUtil.release(cause);
}
}
可以看到,tail 节点在最后会提醒用户没有 caught 住异常,然后释放掉异常,让它不会影响线程的继续运行。所以在 Netty 中,如果某条 pipeline 发生了异常,最远只会传播到 pipeline 的尾节点,不会影响线程的正常运行。
总结
pipeline 的相关内容分析完了,我们以 tips 的形式总结一下相关的知识点:
- pipeline 在服务端 Channel 和客户端 Channel 创建的时候创建
- pipeline 中的数据结构是双向链表,链表的每一个节点都是 ChannelHandlerContext,里面包装了事件处理器 ChannelHandler 和相关的上下文(pipeline 引用)
- 添加和删除的对象都是 ChannelHandlerContext,添加时 Netty 会把事件处理器封装成 ChannelHandlerContext,同时生成节点的执行掩码,掩码的每一位代表了节点关心的事件,事件传播的时候就是根据掩码来选择下一个节点
- Netty 中的事件可以分为 inbound 和 outbound,其中 inbound 事件包括数据的读取和 Channel 状态的改变,outbound 事件包括数据的写入和用户对 Channel 的操作。从用户角度来看,inbound 事件一般是被动接收的,而 outbound 事件是主动发起的
- inbound 事件的传播方向是从 head 节点到 tail 节点;outbound 事件的传播方向是从 tail 节点到 head 节点;异常的传播和 inbound 一样是从 head 节点到 tail 节点,如果前面的节点没有拦截掉异常,那么 tail 节点会提醒用户去处理这个异常,同时 tail 节点也会释放掉这个异常,防止异常影响线程正常工作
- head 节点中的 unsafe 会对 Channel 做具体操作,比如读、写、连接等;而 tail 节点起到了终止事件和异常传播的作用